


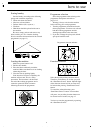

Detergent and softener dispenser
1 Open the drawer.
2 Put powder detergent and the fabric
softener in the compartments as shown.
3 Close the detergent and softener drawer.
Powders and liquids
The performance of the washing machine
depends on the effectiveness of the detergent.
Stains can remain if low quality detergents are
used.
• Only use powders specific for automatic
washers, otherwise over foaming and poor
washing performance will be experienced.
• Do not use liquid detergent in your detergent
drawer. Only use liquid detergents with a
dosing ball.
• Do not attempt to use detergents and
bleaching agents that contain chlorine and
sulphur.
• Concentrated softener may clog the syphon,
in this case add some water to the softener
liquid.
Unloading
The machine stops automatically after
programmes are completed.
1 In about 2 min, the door will unlock. Open
the door.
2 Press the On/Off button to switch off the
machine.
3 Unload the machine and leave the front door
open. Check to see if there is any water left
in the door gasket. If so, remove with a soft
cloth.
Bold type
contents
Introduction
Welcome 2
Installation
Know your washing machine/specification 4
Location 5
Installation 5
Electrical connection 7
Operating
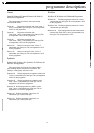
How to use 8
Programme descriptions 12-13
Function buttons 13
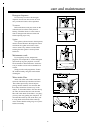
ITCL fabric care symbols 13
Machine care
Care & maintenance 14
Before calling service/troubleshooting 16
Guarantee 17
Service 17
3
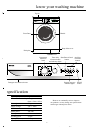
know your washing machine
Capacity (dry fabric) 5kg
Dimensions width x depth x height
60cm x 54cm x 85cm
Net weight 67 kg
Supply voltage 230 V~ 50Hz
Nominal current 10A
Motor power 300 watts
Heater power 2050 watts
Washing speed 52 rpm
Spin speed (max.) 1200 rpm
Because we continually strive to improve
our products, we may change our specifications
and designs without prior notice.
4
specification
location
installation
6
electrical connection
7
8
11
care and maintenance
14
15
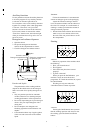
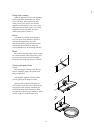
Pump filter warning
When the appliance is in use and depending
on the programme selected there can be hot
water in the filter. Never remove the filter
during a wash cycle, always wait until the
appliance has finished the cycle, and is empty.
When replacing the filter, ensure it is securely
retightened so as to stop leaks and young
children being able to remove it.
Hoses
To prevent any leakage, check the hoses
every two years. If the machine is placed in
cold ambient temperatures, the water
remaining inside the pump and hoses should
be drained to prevent freezing, empty the
water intake hoses by disconnecting from taps.
Drum
Do not leave any metal objects (pins, needles,
etc.) inside the drum. These objects may cause
rust on the drum surface and stain clothing.
Do not clean the drum with abrasive materials.
Cleaning the pump filter
Warning
Hot water danger! Always ensure that the
drum is completely empty. Be careful while
taking out the filter!
Switch off the appliance. Open the filter
cover by pulling at the holder as shown.
Open the filter as shown turning the cap
anti-clockwise, drain the water. If there are any
foreign parts inside the filter, take them out
and clean the filter before replacing it. Then,
place the filter while turning it clockwise. When
securely tightened, close the filter cover.
before calling service/troubleshooting
16
5
Sorting laundry
Sort the laundry according to the following
groups and wash them separately:
• White and colour fast fabrics
• Non-fast, coloured fabrics
• Delicate fabrics (silk, rayon etc.)
• Woollens
• Hand knits should be placed inside out in
the machine.
Be sure to empty pockets and remove any
belts, buckles, pins, etc. from the clothing.
Never exceed the maximum load of the selected
programme (see page 13)
Loading the machine
Make sure power button is off.
1 Pull the door handle.
2 Place the fabrics uniformly inside the
machine. Make sure that there is no clothing
obstructing the door.
3 Close the door by pushing lightly.
If the door does not close completely, the
machine will not start. This is a safety
precaution. The front door is locked until
the end of the washing programme and it
cannot be opened for about 2 minutes
following the end of the programme.
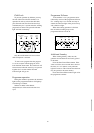
Pump filter cover
Front Door
Kick plate
Top lid
Programme selection
Select the programme after referring to the
programme descriptions and table on
page 12-13.
Warning! Always switch on the machine
before selecting your wash programme.
1 Turn the programme selection knob to the
desired programme. You have now selected
both the washing programme and the
washing temperature at the same time.
2 If you don’t change the spin speed, default
spin speed would be used.
Function selection
Select the desired auxiliary function such as
Time Save, Extra Rinse, etc. before you push
the “Start/Pause/Cancel” button. Indicator light
of the function selected will be on. Door will
be locked after pressing “Start/Pause/Cancel”
button.
To cancel the selected function, press
“Start/Pause/Cancel” button. Your machine
will pause. Any auxiliary function button can
be selected now if needed, see page 13.
You have to start the programme by repressing
the “Start/Pause/Cancel”.
Time delay
selection button
and indicator lights
10
Child Lock
To prevent operation by children you may
activate child lock while the machine is in
operation.In order to activate the child lock,
press Prewash and Time Save function keys
simultaneously for 3 seconds after the washing
programe has started. The prewash indicator
light will flash continously.
Only the on/off button can be used when
child lock option is selected.
To start a new program after the program
is over or to adjust with the program, child
lock should be deactivated. The child lock will
be deactivated when the same keys are pressed
together for 3 seconds and the Prewash
indicator light will go out.
End of the programme
When the program ends “ Spin/End”
indicator light will come on.The door can be
opened after about 2 minutes and machine is
ready for next washing. Press “On/Off” to turn
the machine off.
Auxiliary functions
It is not possible to activate all auxiliary functions
in all wash programs. If any auxiliary function
is selected, its indicator light will be on.
It is restricted to select some auxiliary functions
together. For example, if the cotton programme
is selected, “Time Save” and “pre-wash”
functions can not be selected at the same time.
If “Pre-wash” button is selected first and the
“Time Save” function next, the indicator light
of the pre-wash function will go off as it is not
active any more.
Programme operation
During the machine’s operation, the indicator
lights on the programme follower will light up
as each stage is reached.
Softener is added in the softener
compartment, it will be used in the last rinse
cycle.
Time Delay
Allows you to delay the program start by 3,
6 or 9 hours.
When time delay button is pressed once 3
hours delay is adjusted and indicator light will
come on. If same key is pressed once more
delay will be 6 hours, and if it is pressed once
more 9 hours delay would have been selected.
If time delay button is pressed again delay will
be cancelled. After selection of time delay when
“Start/Pause/Cancel” is pressed the program
will start with delay. During delay period door
can be opened or laundry can be added
After time delay is initiated by pressing
“Start/Pause/Cancel” you can switch machine
to “Pause” mode and change delay time.
Programme Cancelling
To cancel a programme before it starts to
wash press “Start/Pause/Cancel” for 3 seconds.
“Start/Pause/Cancel” and the other indicator
lights will be off .You can select a new program
and start washing.
If the programme has started and you want
to cancel it, press Start/Pause button for 3
seconds. The programme will move to the
“spin” step and spin indicator will light.
Machine will start to pump for draining and
the door can be opened after 1-2 minutes.
9
Detergent and softener drawer
On/Off
button
Programme
Selection
knob
Start/Pause/Cancel
button
Program progress
indicator lights
Adjustable feet
Handle
guarantee
17
12
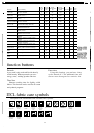
Cottons
Cottons 90, Cottons 60, Cottons 40, Intensive & Stain 60,
Intensive 40 Programmes
These programmes are used for white and coloured
cotton and linen fabrics.
Cottons 90 Programme with main wash (main wash, 3
rinses, 3 intermediate spin, final spin). The set temperature
is 90°C for this programme.
Cottons 60 Programme with main wash
(main wash, 3 rinses, 3 intermediate spin, final spin).The
set temperature is 60°C for this programme.
Cottons 40 Programme with main wash
(main wash, 3 rinses, 3 intermediate spin, final spin).The
set temperature is 40°C for this programme.
Intensive 60 Intensive wash (main wash, 3 rinses, 2
intermediate spin, final spin). The set temperature is 60°C
for this programme.
Intensive 40 Intensive wash (main wash, 3 rinses, 2
intermediate spin, final spin). The set temperature is 40°C
for this programme.
Synthetics
Synthetics 60, Synthetics 40, Synthetics 30, Delicates 40,
Delicates 30 Programmes
These programmes are designed for synthetic fabrics,
nylon clothing, curtains and non iron wool fabrics. The
clothing is washed gently with more water.
Synthetics 60 Normal programme for synthetics (mainwash,
3 rinses, 3 intermediate spin, final spin). The set temperature
is 60°C for this programme.
Synthetics 40 Normal programme for synthetics (main
wash, 3 rinses, 3 intermediate spin, final spin). The set
temperature is 40°C for this programme.
Synthetics 30 Normal programme for synthetics (main
wash, 3 rinses, 3 intermediate spin, final spin). The set
temperature is 30°C for this programme.
Delicates 40 Delicate programme. (main wash, no
intermediate spin, 3 rinses, final spin)
Delicates 30 Delicate programme. (main wash, no
intermediate spin, 3 rinses, final spin)
Woollens
Woollens 40, Woollens cold, Handwash Programmes
Woollens 40 Woollen programme (main wash, 3 rinses,
1 intermediate spin, final spin).The set temperature is 40°C
for this programme.
Woollens Cold Woollen programme (main wash, 3 rinses,
1 intermediate spin, final spin).
Handwash 30 Special programme for hand wash marked
wool and silk. (main wash, 2 rinses, no intermediate spin,
final spin). The set temperature is 30°C.
Auxillary
Function
buttons
Programme selection indicator
how to use
Re-Selection / Cancellation of
Functions After Operation Start
In order to change auxiliary functions, spin
speed, push the Start/Pause/Cancel button for
a short time to pause the program. Change
the auxiliary functions or spin speed from those
allowed by the selected program. Then push
the Start/Pause/Cancel button for a short time
to continue the program.
programme descriptions
Automatic
washing machine
installation & operating
instructions and washing guidance
a
WMA 520 S
WMA 520 W
Time
Delay
3h
6h
9h
Ready Wash Spin/End
Prewash
Time
Save
Extra
Rinse
Start / Pause
Cancel
WMA 520 W
On/Off
150
135
125
160
160
115
105
90
70
65
55
45
40
23
11
2
50
49
49
55
55
50
50
50
55
55
50
50
35
11
_
_
1.70
0.95
0.65
1.00
0.55
0.95
0.55
0.30
0.35
0.25
0.30
0.03
0.15
0.04
0.03
_
Time
Save
Type of laundry
Heavy soiled light Durable fabrics made
of cotton and linen
Normal soiled light cotton and linen
durable to heat
Less soiled light cotton and linen sensitive
to heat
Heavy soiled light Durable fabrics made
of cotton and linen
Heavy soiled light Durable fabrics made of
cotton and linen (baby clothes etc.)
Normal soiled light cotton/synthetic
blended durable to heat
Less soiled light cotton/synthetic blended
durable to heat
Very Less soiled light or cotton/synthetic
blended sensitive to heat
Delicate, sensitive synthetic, cotton
blended
Delicate, sensitive synthetic, cotton
blended
Woollen and delicate blended with
machine wash label
Woollen and delicate laundry with
machine wash sign
Special program for silk, cashmere or
laundry with no machine wash sign
Max
Load
(kg)
5
5
5
6
5
2,5
2,5
2,5
2
2
1.5
1.5
1
5
5
_
Program
Duration
(min.)
Water
Consumption
(lt)
Energy
Consumption
(kWh)
Rinse Program
Spin Program
Pump Program
•
•
•
•
•
•
Prewash
Extra
Rinse
•
•
•
•
•
•
•
•
•
•
•
•
•
•
•
•
•
•
Prewash
A pre-wash is only worth while with heavily
soiled laundry. Without prewash you save
energy, water, washing powder and time.
Time Save
Shortens washing time for lightly soiled
fabrics. This function can be used for all cotton
and synthetic programs.
Extra rinse
Using this function, you can have 4 rinse
cycles instead of 3. The additional rinse will
extract more detergent for sensitive skin.
13
You can locate the washing machine
anywhere (except bathrooms, showers and
away from rain, damp places and water) as
long as you have cold water supply, drainage
and electrical connection alongside.
Ensure there is clearance each side of the
machine to allow slight side ways movement
during washing and spin drying.
Attention!
Never place your machine on a carpet. This
prevents air circulation. The electrical
components of the machine may overheat and
may cause damage.
Please ensure the power, water supplies
and waste are suitable, if in doubt, consult a
qualified plumber or electrician.
Different methods of floor construction can
result in an increase in vibration/noise during
spin modes.
If these symptoms are experienced please
ensure firstly that all four feet are in firm contact
with the floor to minimise any out of balance
vibration which may be generated.
Additional information is available by
request.
In addition to this, washing machines should
not be installed on carpet, foam backed
laminate, or parquet flooring where the nature
of these types of flooring can also contribute
to the inefficient operation of the washing
machine on the spin cycle.
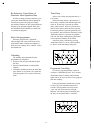
Removing transport safety bolts
The transport safety bolts must be removed
before any operation of the machine.
1
Turn the bolt heads C anti-clockwise until
the bolt can be partially withdrawn.
2
Remove them and the rubber bushes by
pulling outwards. An up/down action and
a small squirt of washing up liquid will ease
removal.
3
Plastic plugs, supplied inside the protective
bag, designated P, should be placed in the
safety bolt holes as shown.
Attention! Keep the safety bolts for future
transportation and reinstate them before
transporting your machine. Never transport
your machine without the transport bolts in
position. Any resultant damage is not covered
by the warranty.
Water inlet connection
Your machine comes with cold water
connection only.
Connect the cold water using the hose with
blue printing or colour.
Cold water supply
For proper operation, the pressure of cold
water should be between 1 and 10 bars. (1
bar corresponds to more
than 8 litres per minute
flow rate with a fully open
tap.)
To prevent water leaks,
sealing washers are
supplied with the water inlet hose inside the
machine. Place these on the hose end and
tighten both ends fully.
In order to prevent any water leakage and
damage, turn off the water tap when not in
use. Connect the right angled end of the hose
to the machine water inlet.
The washing machine must only be
connected with the new hose provided and
old hoses must not be reused.
Drain hose
The drain hose should be placed and secured
either at the side of the sink A, directly to the
drain B or directly to the waste water
inlet C.
• The hose should not be bent.
• Using method A, the drain hose should be
secured with the elbow so that it can not
be dislodged.
• The waste pipe must only be connected
into the foul drains and not surface water
drainage system.
• The hose should be placed between 20 and
80cm from the floor level and must not be
extended otherwise the machine may not
empty the waste water.
• The minimum diameter of any external pipe
must be 32 mm.
min.
Electrical requirements
Before you insert the plug into the wall
socket make sure that the voltage and the
frequency shown in the rating label corresponds
to your electricity supply.
We recommend that this appliance be
connected to the mains supply via a suitable
switched and fused socket in a readily accessible
position.
Should the mains lead of the appliance
become damaged or need replacing at any
time, it must be replaced by a special purpose
made mains lead which can only be obtained
from a Beko Authorised Service Agent.
Warning
This appliance must be earthed
If the fitted moulded plug is not suitable for
your socket, then the plug should be cut off
and an appropriate plug fitted.
The moulded plug on this appliance
incorporates a 13A fuse. Should the fuse need
to be replaced an ASTA approved BS1362 fuse
of the same rating must be used. Do not forget
to refit the fuse cover. In the event of losing
the fuse cover, the plug must not be used until
a replacement fuse cover has been fitted.
Colour of the replacement fuse cover must be
the same colour as that visible on the pin face
of the plug. Fuse covers are available from any
good electrical store.
In order to avoid hazards, damaged supply
cord should be replaced by the manufacturer,
its service agent or similarly qualified people.
Important
Fitting a different plug
As the colours of the wires in the mains
lead of this appliance may not correspond with
the coloured markings identifying the terminals
on your plug, proceed as follows:
1
Connect the green - yellow or green (earth)
wire to the terminal in the plug marked ‘E’
or with the symbol f or coloured green and
yellow or green.
2
Connect the blue (neutral) wire to the
terminal in the plug marked ‘N’ or coloured
black.
3
Connect the brown (live) wire to the terminal
in the plug marked ‘L’ or coloured red.
With the alternative plugs a 13A fuse must
be fitted either in the plug or adaptor or in the
main fuse box. If in doubt contact a qualified
electrician.
Green and yellow
or green
Make sure that you have an earthed power
outlet socket rated at 13 amps (minimum).
Attention!
If you use your machine as built-in, the
socket must be reachable after installation, or
a separate switch (which can disconnect the
two poles) must be used in the installation.
L
Brown or red
N
Blue or
black
Detergent dispenser
It is necessary to remove the detergent
dispenser drawer from time to time to clean
away residue and ensure correct operation.
To remove
Pull out the drawer and press down on the
coloured insert to release it fully from its
housing. Wash the drawer in warm water to
remove detergent and softener residue and
before replacing wipe it dry.
Syphon
The syphon (coloured insert in the dispenser)
must be cleaned. Remove the dispenser drawer
and lift out the syphon and wash in warm
water to remove any softener residue. Refit
ensuring that the syphon is correctly fitted
before use.
Maintenance wash
If you regularly use low temperature
programs, for example 40˚C, certain detergents
cause build up of greasy deposits over time.
We recommend a hot maintenance wash once
every 6 months to clear such accumulation of
residue.
Simply run the wash programme “Cotton
90” without laundry using the usual amount
of detergent.
Water intake filter
At the end of the water intake connection
and water inlet hose-tap side there are filters.
These filters prevent any dirt and objects
passing into the machine. It is advisable that
these filters should be cleaned every 30-40
washes. To clean these filters, first turn the tap
off. Then, disconnect the hose and clean the
filter with a thin brush. If the filter is very dirty,
you may clean it by pulling out with pliers. To
clean the filter at the tap side of the hose, pull
it out by hand and clean the filter under tap
water. Ensure that the sealing rings are in place
before reassembly.
You turned the machine on, but the indicator
lightt is not lit
Have you plugged in and switched on at
the socket? Check the power cable, or for a
blown fuse. Check the front door is properly
closed.
After your machine starts operation, if
Start/Pause/Cancel button starts flashing then
door is not locked. Open and close the door
again and press Start/Pause/Cancel button to
begin washing program again.
Machine does not take in water
• Check the door for proper closure. Either
tap closed or water inlet filter is clogged.
• Turn the programme selector to the
programme required.
• If the “wash” led on the program progress
display and Start/Pause/Cancel button are
flashing either there is no water or tap is
off. Check your taps. PressStart/Pause/Cancel
button. If the problem persists unplug your
machine, turn off tap water and call
authorized service.
Water is syphoned / discharged
Check if the drain hose is positioned as
described on page 6.
If the machine vibrates or is too noisy
• Have all the transit bolts and packing been
removed?
• Is the machine touching something?
• Are all the feet resting firmly on the ground?
• Have the lock nuts been secured?
• Has the recommended wash load been
exceeded? (See page 12 for max program
loads)
Water coming from beneath the machine
Check the water inlet and drain hoses.
Tighten the connections. The washers of the
hoses may be worn out or the pump filter may
not have been closed properly.
Foam coming out of the detergent dispenser
Check whether your detergent is suitable
for automatic machines. Next time use less
detergent.
Pump does not drain water
Check Rinse Hold button has not been
selected in error. Clean the pump filter. Do not
attempt to remove the filter if the machine is
full of water. Check whether the drain hose is
bent or not. If there is a need to clean the
pump filter, refer to the pump filter cleaning
section on page 15.
Pre-wash indicator light on the program
follower is blinking
Cancel child lock
Amounts
Follow the manufacturer’s recommended
amount of detergent given on the packaging.
Adjust the amount according to the dirt
level, the amount of fabric and the softness of
the water. For example, if a small amount of
clothing is washed, put in half the amount of
detergent normally required.
• Do not fill the fabric softener above the max
mark as any excess amount will mix into
the wash water and you will have to re-fill
the compartment.
Beko plc Beko House, Caxton Way, Watford
Hertfordshire, WD18 8UF
Tel: 08707741050 Fax: 08707741090
Email: service@beko.co.uk www.beko.co.uk
function buttons
Feet adjustment
To ensure quiet and stable operation, the
machine should be positioned correctly and
leveled. If the machine is unstable, adjust feet
by loosening the plastic lock nut and screwing
or unscrewing the feet until the machine is
level. After positioning, tighten the lock nut.