


E-8E-7
Disclaimer⋯⋯⋯⋯⋯⋯⋯⋯⋯⋯⋯⋯⋯⋯⋯⋯⋯⋯⋯⋯⋯⋯⋯E-1
Please read the following before using the product ⋯⋯⋯⋯⋯E-1
For safe use⋯⋯⋯⋯⋯⋯⋯⋯⋯⋯⋯⋯⋯⋯⋯⋯⋯⋯⋯⋯⋯⋯E-1
Batteries ⋯⋯⋯⋯⋯⋯⋯⋯⋯⋯⋯⋯⋯⋯⋯⋯⋯⋯⋯⋯⋯⋯⋯E-3
For Prevention of Water Leakage Accidents ⋯⋯⋯⋯⋯⋯⋯⋯E-4
Handling the Product ⋯⋯⋯⋯⋯⋯⋯⋯⋯⋯⋯⋯⋯⋯⋯⋯⋯⋯E-5
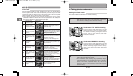
Contents ⋯⋯⋯⋯⋯⋯⋯⋯⋯⋯⋯⋯⋯⋯⋯⋯⋯⋯⋯⋯⋯⋯E-7-8
1. Preparations ⋯⋯⋯⋯⋯⋯⋯⋯⋯⋯⋯⋯⋯⋯⋯⋯⋯⋯⋯E-9
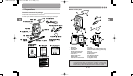
Checking the contents of the package ⋯⋯⋯⋯⋯⋯⋯⋯⋯⋯E-9
Names of the parts ⋯⋯⋯⋯⋯⋯⋯⋯⋯⋯⋯⋯⋯⋯⋯⋯⋯⋯E-10
Preparing the case ⋯⋯⋯⋯⋯⋯⋯⋯⋯⋯⋯⋯⋯⋯⋯⋯⋯⋯E-11
Attaching/removing/the diffuser plate ⋯⋯⋯⋯⋯⋯⋯⋯⋯⋯E-11
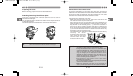
Connection to the camera case ⋯⋯⋯⋯⋯⋯⋯⋯⋯⋯⋯⋯⋯E-12
1) Connecting the underwater TTL cable ⋯⋯⋯⋯⋯⋯⋯⋯E-12
2) Connecting the hot shoe cable ⋯⋯⋯⋯⋯⋯⋯⋯⋯⋯⋯E-13
3) Mounting on an arm ⋯⋯⋯⋯⋯⋯⋯⋯⋯⋯⋯⋯⋯⋯⋯⋯E-14
2. Advance Check of the Case ⋯⋯⋯⋯⋯⋯⋯⋯⋯⋯E-15
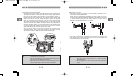
Advance test before use ⋯⋯⋯⋯⋯⋯⋯⋯⋯⋯⋯⋯⋯⋯⋯⋯E-15
Advance Test⋯⋯⋯⋯⋯⋯⋯⋯⋯⋯⋯⋯⋯⋯⋯⋯⋯⋯⋯⋯E-15
3. Insertion of the electronic flash ⋯⋯⋯⋯⋯⋯⋯⋯E-16
Checking the electronic flash ⋯⋯⋯⋯⋯⋯⋯⋯⋯⋯⋯⋯⋯⋯E-16
Checking the Batteries ⋯⋯⋯⋯⋯⋯⋯⋯⋯⋯⋯⋯⋯⋯⋯⋯E-16
Inserting in the case ⋯⋯⋯⋯⋯⋯⋯⋯⋯⋯⋯⋯⋯⋯⋯⋯⋯⋯E-16
Which electronic flashes can be used? ⋯⋯⋯⋯⋯⋯⋯⋯⋯E-16
Opening the case ⋯⋯⋯⋯⋯⋯⋯⋯⋯⋯⋯⋯⋯⋯⋯⋯⋯⋯⋯E-17
Inserting the flash ⋯⋯⋯⋯⋯⋯⋯⋯⋯⋯⋯⋯⋯⋯⋯⋯⋯⋯E-17
Insertion of silica gel ⋯⋯⋯⋯⋯⋯⋯⋯⋯⋯⋯⋯⋯⋯⋯⋯⋯E-18
Check the loading status ⋯⋯⋯⋯⋯⋯⋯⋯⋯⋯⋯⋯⋯⋯⋯⋯E-19
Seal the Case ⋯⋯⋯⋯⋯⋯⋯⋯⋯⋯⋯⋯⋯⋯⋯⋯⋯⋯⋯⋯E-19
Perform the final check ⋯⋯⋯⋯⋯⋯⋯⋯⋯⋯⋯⋯⋯⋯⋯⋯E-20
Visual inspection ⋯⋯⋯⋯⋯⋯⋯⋯⋯⋯⋯⋯⋯⋯⋯⋯⋯⋯E-20
Setting she flush power to ON and OFF ⋯⋯⋯⋯⋯⋯⋯⋯E-20
Final Test ⋯⋯⋯⋯⋯⋯⋯⋯⋯⋯⋯⋯⋯⋯⋯⋯⋯⋯⋯⋯⋯⋯E-21
Contents
4. Taking photos underwater ⋯⋯⋯⋯⋯⋯⋯⋯⋯⋯⋯E-22
Setting the flash mode ⋯⋯⋯⋯⋯⋯⋯⋯⋯⋯⋯⋯⋯⋯⋯⋯E-22
Underwater TTL AUTO shooting ⋯⋯⋯⋯⋯⋯⋯⋯⋯⋯⋯E-22
Underwater MANUAL shooting ⋯⋯⋯⋯⋯⋯⋯⋯⋯⋯⋯⋯E-22
5. Handling after use ⋯⋯⋯⋯⋯⋯⋯⋯⋯⋯⋯⋯⋯⋯⋯E-23
Wipe off any waterdrop ⋯⋯⋯⋯⋯⋯⋯⋯⋯⋯⋯⋯⋯⋯⋯⋯E-23
Removing the electronic flash⋯⋯⋯⋯⋯⋯⋯⋯⋯⋯⋯⋯⋯⋯E-24
Cleaning the case with pure water⋯⋯⋯⋯⋯⋯⋯⋯⋯⋯⋯⋯E-24
Disconnecting the TTL cable ⋯⋯⋯⋯⋯⋯⋯⋯⋯⋯⋯⋯⋯⋯E-25
Drying the case and TTL cable ⋯⋯⋯⋯⋯⋯⋯⋯⋯⋯⋯⋯⋯E-25
6. Maintaining the Waterproof Function ⋯⋯⋯⋯⋯E-26
Remove the O-ring. ⋯⋯⋯⋯⋯⋯⋯⋯⋯⋯⋯⋯⋯⋯⋯⋯⋯⋯E-26
Remove any sand, dirt, etc. ⋯⋯⋯⋯⋯⋯⋯⋯⋯⋯⋯⋯⋯⋯E-26
Install the O-ring. ⋯⋯⋯⋯⋯⋯⋯⋯⋯⋯⋯⋯⋯⋯⋯⋯⋯⋯⋯E-27
How to Apply Grease to the O-ring ⋯⋯⋯⋯⋯⋯⋯⋯⋯⋯⋯E-27
Replace consumable products. ⋯⋯⋯⋯⋯⋯⋯⋯⋯⋯⋯⋯⋯E-28
7. Appendix⋯⋯⋯⋯⋯⋯⋯⋯⋯⋯⋯⋯⋯⋯⋯⋯⋯⋯⋯⋯⋯E-29
Q & A on the use of the PFL-01 ⋯⋯⋯⋯⋯⋯⋯⋯⋯⋯⋯⋯⋯E-29
After-sale Service ⋯⋯⋯⋯⋯⋯⋯⋯⋯⋯⋯⋯⋯⋯⋯⋯⋯⋯⋯E-34
Specifications ⋯⋯⋯⋯⋯⋯⋯⋯⋯⋯⋯⋯⋯⋯⋯⋯⋯⋯⋯⋯E-35
*PFL-01(E).qxd 03.11.27 3:14 PM ページ E-7 (1,1)