


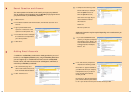

Insert the BlackBerry Desktop Software Installation CD in your computer. If the
installation program doesn't start automatically, then on the Windows taskbar,
click Start, then click Run. The Run window will appear. In the Open field,
type 'd:\setup.exe' where 'd' is the name of your CD-ROM or DVD-ROM drive.
Press Enter.
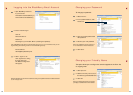
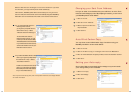
To confirm the handheld-to-desktop software connection:
Make sure the USB cable is properly plugged into an available USB port on
your computer and that your handheld is securely connected to the USB cable.
Open the 'Desktop software' and on the 'Options' menu click 'Connection
Settings'. The Connection Settings window will appear.
Click 'Detect' to confirm that your handheld is connected to desktop software.
You will receive a message confirming the connection to your handheld. Click OK.
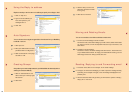
Click 'OK' to exit the Connection Settings window. The desktop manager will
display your handheld's Personal Identification Number (PIN) and connection
status. When the connection has been made, you should see 'Connected' in
the status bar at the bottom of the window.
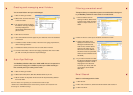
To sync your BlackBerry handheld with your computer double click on 'Intellisync'.
Configure the settings to synchronised with your personal information
management (PIM) applications. For example, select 'Configure PIM' and
tick the applications you want synchronised e.g. Calendar, Address Book,
Memo Pad and Tasks. Use the 'Choose' button to select an appropriate translator
e.g. Microsoft Outlook
®
, Lotus Notes. Select 'OK', then 'synchronise now'.
Your BlackBerry handheld should now synchronise with your PC.
Installing the Desktop Software
When you are logged in to your BlackBerry email account select Help from the BlackBerry Homepage.
• Read the BlackBerry FAQ's at www.CSL1010.com or www.one2free.com.
• Refer to the BlackBerry Wireless Handheld Getting Started and Quick Reference Guide supplied
with the handheld or download the Handheld User Guide from www.CSL1010.com/blackberry
or www.one2free.com/blackberry.
For Additional Help
P.16
P.15