


Quick Setup Wizard
When you power on your device for the first time, a Quick Start Wizard will guide you through
touch screen calibration, provide a quick tutorial on stylus operation and pop-up menus, and
allow you to set the date, time, and a device password.
Follow the on-screen instructions to complete the wizard.
Synchronize Your Device and Computer
Synchronize your device with your computer to keep information such as Outlook e-mails,
contacts, tasks, and appointments up-to-date on your device.
Set up synchronization software on your computer
Depending on the operating system of your computer, you will need either Microsoft
ActiveSync® 4.5 (or later) or Windows Mobile® Device Center to synchronize your device with
your computer.
2
Select the information you want to
synchronize and click Next.
Set up Windows Mobile Device
Center on Windows Vista®
Set up ActiveSync on Windows® XP
1
Install ActiveSync 4.5 on your computer
from the Getting Started Disc.
2
Connect your device to your computer.
The Synchronization Setup Wizard
automatically starts and guides you to
create a synchronization partnership. Click
Next to proceed.
3
To synchronize your device with your
computer, clear the Synchronize
directly with a server running Microsoft
Exchange check box and click Next.
4
Select the information types that you want
to synchronize, then click Next.
5
Choose whether to allow wireless
connections while your device is
connected to the computer.
1
Connect your device to your
computer. In Windows Mobile Device
Center, click Set up your device.
3
Type a name for your device and click
Set Up.
Click Finish.
6
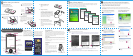
The Touch Phone
HTC Home™
HTC Home™ is a Today screen plug-in that gives you up-to-date
local information at a glance, such as time, date, and weather
information, and shows new messages and missed calls. It also
has a customizable launcher where you can add your favorite
applications for one-touch access and a Profile selector where
you can quickly change the profile or ring tone of your device.
TouchFLO™
TouchFLO™ gives you better touch panel experience on your
device. Using TouchFLO, you can easily scroll and pan the screen
by sliding your finger on the touch panel. TouchFLO also has the
Touch Cube where you can add your favorite contacts, access
media, launch programs, and more.
Finger scrolling
While on a Web page, document, or list (such as contacts list, file list, etc.),
slide your finger upward to scroll down or slide your finger downward to
scroll up.
To scroll to the right, slide your finger to the left. To scroll to the left, slide
your finger to the right.
Touch Cube
To open the Touch Cube, slide your finger
upward, starting from the bottom of the
touch screen where it shows a logo image.
To close the Touch Cube, slide your finger
downward.
Touch Cube is a three-dimensional, cubic
user interface. To flip the interface from one
side to another, slide your finger left or right
on the touch screen.
Finger panning
Touch and hold on the touch screen and then drag your finger around
the screen.
Before Using Your Device
E. Charge the battery
The battery is partially charged out of the
box. To charge the battery inside your
device, connect the AC adapter plug to
an electrical outlet and connect the USB
end to the Sync connector at the bottom
of your device. The battery is fully charged
after about 3 hours of charging.
F. Power on/off the device
Press and hold the POWER button for
about 3 seconds to power on/off your
device.
When powering off, a confirmation
message will appear. Tap Yes to power off
the device.
4
B. Install the SIM Card
D. Replace the back cover
Slide the back cover into
place.
Opening the Touch Cube
2
C. Install the battery
Install the battery by aligning its exposed copper
contacts with the battery connectors inside the
battery compartment. Insert the contact’s side of
the battery first, then
gently push the battery
into place.
Cut corner
of SIM card
1
Push the SIM
card holder
to the right to
unlock it.
Flip the SIM
card holder up.
3
Insert the USIM/SIM card with its gold
contacts facing down and its cut-off corner
facing the battery compartment.
Push the SIM card holder down until it
snaps into place to lock it. When you insert
the battery, the SIM card lock secures the
SIM card in place.
Battery
connectors
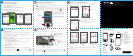
Go Online and Surf the Web
Go online by turning on Wi-Fi® on your device.
Note If there is no Wi-Fi hotspot in your area, you can still connect to the Internet by using the 3G / GPRS or dial-up
service of your wireless service provider. Refer to the User Manual to learn how to connect using 3G / GPRS or
dial up.
1
Tap Start > Programs
> Comm Manager
and tap Wi-Fi.
Select the wireless
network you want to
connect to and tap
OK.
2
Select The Internet
and tap Connect.
3
Note If you are connecting to a secured wireless network, you may need to enter a Key for that network
connection before you can connect to it.
When connected, launch Internet Explorer® Mobile (tap Start > Internet Explorer) to surf the Web.
POWER Earpiece
Touch Screen
TALK
NAVIGATION
WHEEL / ENTER
CAMERA
Volume
Control
Stylus
Second Camera
microSD™
Card Slot
END
Microphone
A. Remove the back cover
Ensure that the device is turned
off and slide the battery cover off.
SIM card lock
VOICE
COMMAND
GPS
INTERNET EXPLORER