


Manage your SIM cards
Your phone supports Dual SIM mode that enables you
to use two SIM cards at the same time without changing
them. Learn to activate SIM cards and change the card
settings.
Your device supports dual standby with two different
networks. You cannot make or answer calls on both
networks at the same time.
To switch networks
In Idle mode, press and hold the Back key to switch
between networks. The icon of the selected SIM card is
highlighted.
To activate SIM cards
In Menu mode, select 1. Settings → SIM cards
management → Network.
Select a SIM card 2. → On.
Select 3. Save.
To switch SIM cards automatically
In Menu mode, select 1. Settings → SIM cards
management → SIM auto switch.
Select 2. SIM auto switch.
Set the starting and ending time to use the SIM 3.
card.
Select 4. Save.
To change the names and icons of the SIM cards
In Menu mode, select 1. Settings → SIM cards
management → Register card.
Select a SIM card and change the name and the 2.
icon of the card.
Select 3. Save.
Repeat steps 2-3 for another SIM card.4.
Make a call
In Idle mode, select 1. Keypad and enter an area code
and a phone number.
Press [2.
] to dial the number.
To end the call, press [3.
].
Answer a call
When a call comes in, press [1. ].
To end the call, press [2.
].
Adjust the volume
To adjust the volume of the ringtone
In Menu mode, select 1. Settings → Sound profiles.
Select the profile you are using.2.
If you are using the silent profile, you are not allowed
to adjust the volume of the ringtone.
Select a SIM card.3.
Select 4. Volume → Call alert.
Drag the slider to adjust the volume level and select 5.
Save.
To adjust the volume of the touch tone
In Idle mode, press the Volume key to adjust the volume.
To adjust the volume of voice during a call
While a call is in progress, press the Volume key up or
down to adjust the volume.
In noisy environments, you may have difficulty
hearing the calls while using the speakerphone
feature. For better audio performance, use the
normal phone mode.
Change your ringtone
In Menu mode, select 1. Settings → Sound profiles.
Select the profile you are using.2.
If you are using the silent profile, you are not allowed
to change the ringtone.
Select a SIM card.3.
Select 4. Voice call ringtone.
Select a memory location (if necessary).5.
Select a ringtone and select 6. Set.
To switch to another profile, select it from the list.
Call a recently dialled number
In Idle mode, press [1. ] to display a list of recent
numbers.
Select 2.
◄ or ► to a call type.
Scroll up or down to a number or name.3.
Select the number or name to view details of the call 4.
and press [
] to dial the number.
T9 mode
Press the appropriate virtual keys to enter an entire 1.
word.
When the word displays correctly, press 2.
to
insert a space. If the correct word does not display,
select
to select an alternate word.
ABC mode
Press an appropriate virtual key until the character you
want appears on the display.
Number mode
Press an appropriate virtual key to enter a number.
Symbol mode
Press an appropriate virtual key to enter a symbol.
To use other features for text input
To move the cursor, select • and then the virtual
navigation key.
To delete characters one by one, select •
. To delete
words quickly, tap and hold
.
To enter punctuation marks, select • 1 repeatedly.
To change case, select •
. To type all the words in
uppercase, double tap
.
Tap and hold: Tap an item and hold it for more than •
2 seconds.
Drag: Tap and hold on an item, and then drag your •
finger to move the item.
Turn your phone on or off
To turn your phone on,
Press and hold [1.
].
Enter your PIN and press 2. OK (if necessary).
When the setup wizard opens, customise your 3.
phone as desired by following the screen.
If the battery remains fully discharged or removed
from the device, the time and date will be reset.
To turn your phone off, repeat step 1 above.
Access menus
To access your phone’s menus,
In Idle mode, press 1. Menu to access Menu mode.
Scroll left or right to a main menu screen.2.
Select a menu or application.3.
Press the Back key to move up one level; Press 4.
[
] to return to Idle mode.
When you access a menu requiring the PIN2, you •
must enter the PIN2 supplied by the SIM card.
For details, contact your service provider.
Samsung is not responsible for any loss of •
passwords or private information or other
damages caused by illegal software.
Add a new contact
The memory location to save new contacts may
be preset depending on your service provider.
To change the memory location, in Menu mode,
select Contacts → More → Settings → Save new
contact to → a memory location → Save.
In Idle mode, select 1. Keypad and enter a phone
number.
Select 2.
.
Select 3. Create contact → a memory location
(if necessary).
Select a number type (if necessary).4.
Enter contact information.5.
Select 6. Save to add the contact to memory.
Send and view messages
To send a text or multimedia message
In Menu mode, select 1. Messages → Create
message.
Select the recipient field 2. → Enter manually.
Enter a recipient number and select 3. Done.
Select the text input field.4.
Enter your message text and select 5. Done.
See “Enter text.”
For sending as a text message, skip to step 7.
For attaching multimedia, continue with step 6.
Select 6. Add media and add an item.
Select 7. Send to send the message.
To view text or multimedia messages
In Menu mode, select 1. Messages → Inbox.
Select a text or multimedia message.2.
Make fake calls
You can simulate an incoming call when you want to get
out of meetings or unwanted conversations.
To activate the fake call feature
In Menu mode, select Settings → Call → Fake call →
Fake call hot key.
To make a fake call
In Idle mode, press and hold the Volume key down.
Activate and send an SOS message
In an emergency, you can send SOS messages to your
family or friends for help.
To activate the SOS message
In Menu mode, select 1. Messages → Settings →
SOS messages → Sending options.
Select 2. Sending SOS to activate the SOS message
feature.
Select 3. Recipients → Add recipients → Contacts.
You can also enter phone numbers in the recipient
list. Skip to step 7.
Select 4. Multiple.
Select contacts 5. → Add.
Select a number (if necessary).6.
When you are finished setting the recipients, select 7.
Save to save the recipients.
Select 8. Repeat, set the number of times to repeat the
SOS message, and select Save.
Press the Back key 9. → Yes.
To send an SOS message
With the touch screen and the keys locked, press the 1.
Volume key four times to send an SOS message to
preset numbers.
To exit SOS mode, press [2.
].
Use the camera
To capture photos
In Menu mode, select 1. Camera to turn on the camera.
Rotate the phone counterclockwise to landscape 2.
view.
Aim the lens at the subject and make any 3.
adjustments.
Press 4.
to take a photo. The photo is saved
automatically.
To view photos
In Menu mode, select My files → Images → a photo file.
To record videos
In Menu mode, select 1. Camera to turn on the camera.
Rotate the phone counterclockwise to landscape 2.
view.
Select 3.
to switch to Recording mode.
Use widgets
Learn to use widgets on the idle screen.
Some of your widgets connect to web services. •
Selecting a web-based widget may incur additional
charges.
Available widgets may vary depending on your •
region or service provider.
To open a widget
In Idle mode, scroll left or right to a panel of the idle 1.
screen.
Select a widget to activate on the idle screen.2.
To organize your widget
You can organise each panel of the idle screen with your
favourite widgets.
In Menu mode, select 1. Settings → Display →
Widgets.
Select a widget for each panel.2.
Enter text
To change the text input mode
Select • EN to change the input language.
Select • T9 to switch between T9 and ABC modes. The
dot turns green in T9 mode.
Select • 123 or sym to switch to Number or Symbol
mode.
Aim the lens at the subject and make any 4.
adjustments.
Press 5.
to start recording.
Press 6.
to stop recording. The video is saved
automatically.
To view videos
In Menu mode, select My files → Videos → a video file.
Set and use alarms
To set a new alarm
In Menu mode, select 1. Alarms.
Press 2. Create.
Set alarm details.3.
Press 4. Save.
The snooze feature sets the phone to repeat the
alarm after a specified length of time. To set the
length of time for the snooze feature, select Settings
→ Snooze.
To stop an alarm
When the alarm sounds,
Tap and hold • Stop to stop the alarm.
Tap and hold • Snooze to silence the alarm for the
snooze period.
To deactivate an alarm
In Menu mode, select 1. Alarms.
Select the dot next to the alarm you want to 2.
deactivate.
Instructional icons
Caution: situations that could cause damage
to your device or other equipment
Note: notes, usage tips, or additional
information
→
Followed by: the order of options or menus
you must select to perform a step; for
example: In Menu mode, select Messages
→ Create message (represents Messages,
followed by Create message)
[ ]
Square brackets: phone keys; for example:
[
] (represents the Power/End key)
Use the touch screen
Learn basic actions to use the touch screen.
To avoid scratching the touch screen, do not use
sharp tools.
For the optimal use of the touch screen, remove •
the protection film before using your phone.
Your touch screen has a layer that detects small •
electrical charges emitted by the human body. For
best performance, tap the touch screen with your
fingertip. The touch screen will not react to touches
of sharp tools, such as a stylus or pen.
Tap: Touch once to select or launch a menu, option, or •
application.
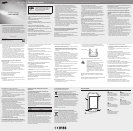
Install the SIM card and battery
Remove the back cover and battery and insert the 1.
SIM cards.
Insert the battery and replace the back cover.2.
Charge the battery
Plug a travel adapter.1. When charging is 2.
finished, unplug the
travel adapter.
Do not remove the battery before removing the •
travel adapter. Doing this may cause damage to
the phone.
To save energy, unplug the travel adapter when •
not in use. The travel adapter does not have
a power switch, so you must unplug the travel
adapter from the outlet when not in use to avoid
wasting power. The travel adapter should remain
close to the socket when in use.
Insert a memory card (optional)
Your phone accepts microSD
™
or microSDHC
™
memory cards up to 16 GB (depending on memory card
manufacturer and type).
Formatting the memory card on a PC may cause •
incompatibility with your phone. Format the
memory card only on the phone.
Frequent writing and erasing of data will shorten •
the life span of memory cards.
Remove the back cover and the battery.1.
Insert a memory card with the gold-coloured 2.
contacts facing down.
Push the memory card in the memory card slot until 3.
it locks in place.
Replace the battery cover.4.
To AC power outlet
Back cover
Battery
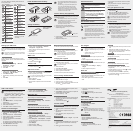
Icon Description
Signal strength
1
GPRS network
connected
EDGE network
connected
Call in progress
Call diverting
activated
SOS message
feature activated
Alarm activated
Connecting to
secured web page
Connected to PC
FM radio on
FM radio paused
Music playback in
progress
Music playback
paused
Roaming (outside
of normal service
area)
Icon Description
Bluetooth
activated
New text message
(SMS)
New multimedia
message (MMS)
New Email
message
New voice mail
message
Memory card
inserted
Normal profile
activated
Silent profile
activated
Battery power
level
10:00
Current time
1. This icon may vary
depending on your SIM
card setting.
Your phone displays the following status indicators on
the top of the screen:
SIM cards
Memory card
Declaration of Conformity (R&TTE)
We, Samsung Electronics
declare under our sole responsibility that the product
GSM Blutooth Mobile Phone : GT-C3312
to which this declaration relates, is in conformity with the following standards and/or
other normative documents.
SAFETY EN 60950-1 : 2006 + A1 : 2010
SAR EN 50360 : 2001 / AC 2006
EN 62209-1 : 2006
EN 62479 : 2010
EMC EN 301 489-01 V1.8.1 (04-2008)
EN 301 489-07 V1.3.1 (11-2005)
EN 301 489-17 V2.1.1 (05-2009)
RADIO EN 301 511 V9.0.2 (03-2003)
EN 300 328 V1.7.1 (10-2006)
We hereby declare that [all essential radio test suites have been carried out and that]
the above named product is in conformity to all the essential requirements of Directive
1999/5/EC.
The conformity assessment procedure referred to in Article 10 and detailed in Annex[IV]
of Directive 1999/5/EC has been followed with the involvement of the following Notified
Body(ies):
BABT, Forsyth House,
Churchfield Road,
Walton-on-Thames,
Surrey, KT12 2TD, UK*
Identification mark: 0168
The technical documentation kept at :
Samsung Electronics QA Lab.
which will be made available upon request.
(Representative in the EU)
Samsung Electronics Euro QA Lab.
Blackbushe Business Park, Saxony Way,
Yateley, Hampshire, GU46 6GG, UK*
2011.12.01 Joong-Hoon Choi / Lab Manager
(place and date of issue) (name and signature of authorised person)
* It is not the address of Samsung Service Centre. For the address or the phone number of
Samsung Service Centre, see the warranty card or contact the retailer where you purchased
your product.