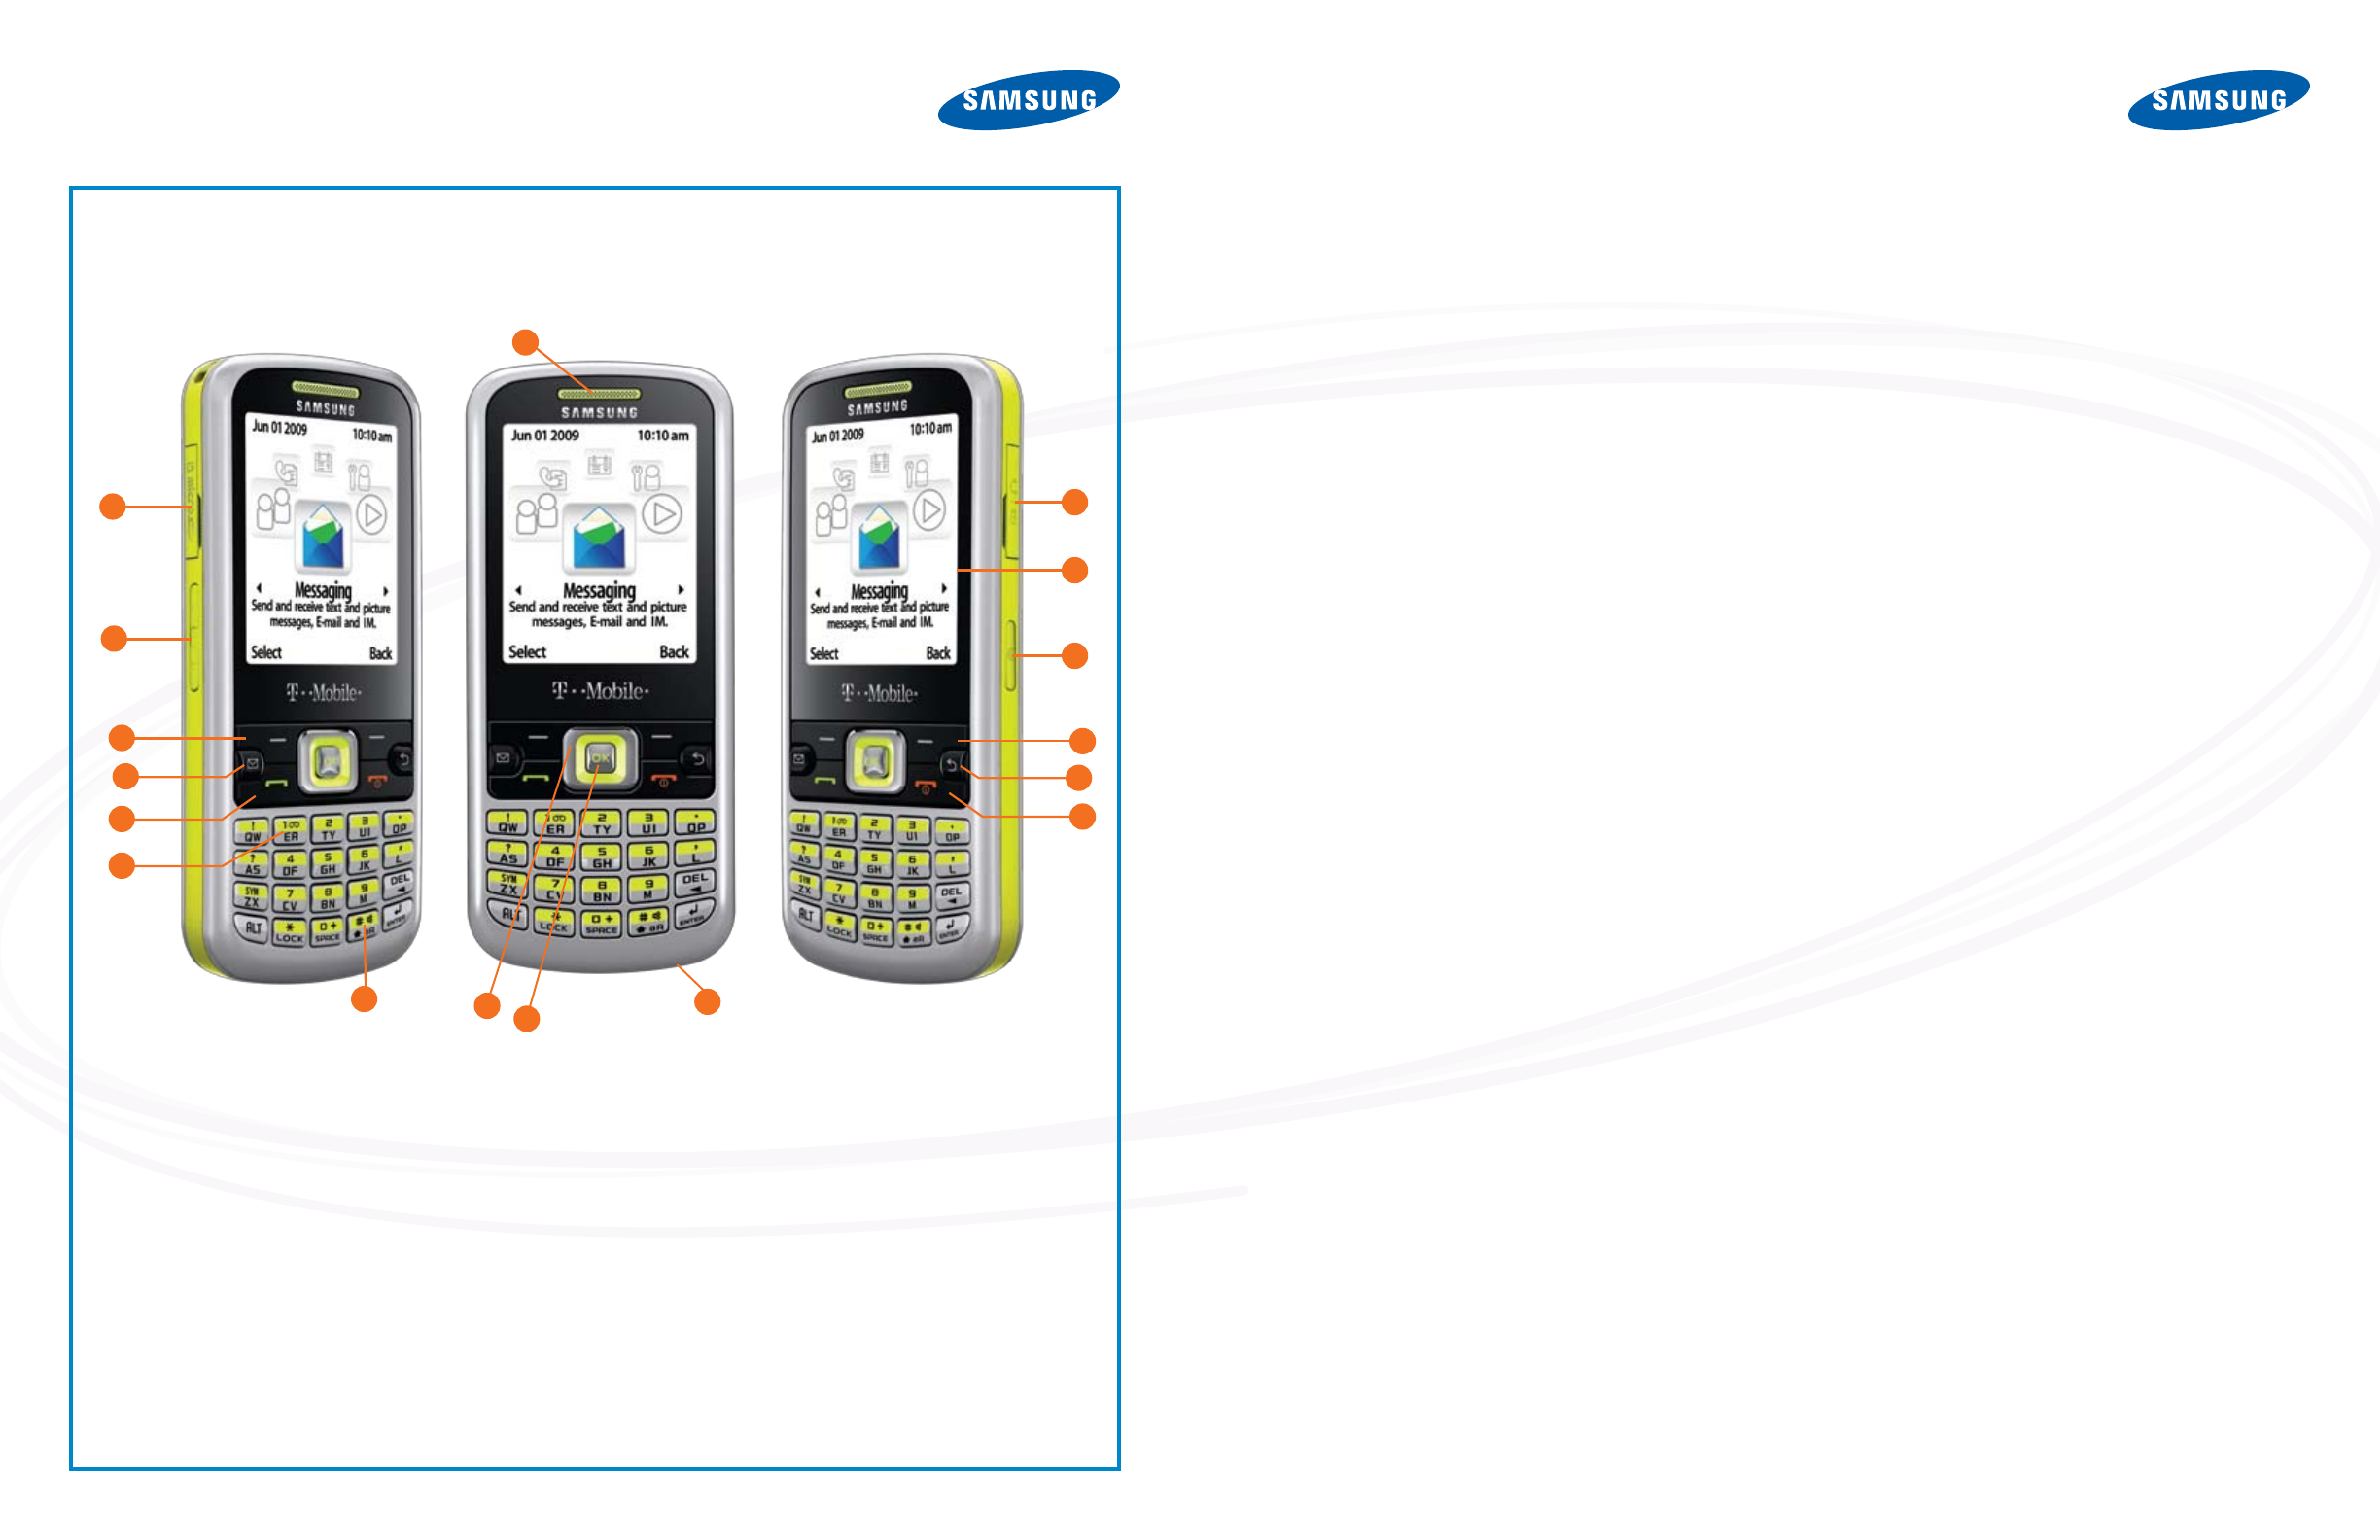
BUTTON MAP
TIPS & TRICKS
WHY SAMSUNG?
ABOUT SAMSUNG ELECTRONICS
Samsung Electronics Co., Ltd. is a global leader in semiconduc-
tor, telecommunication, digital media and digital convergence tech-
nologies with 2007 consolidated sales of US$105 billion. Employing
approximately 150,000 people in 134 ofces in 62 countries, the
company consists of two main business units: Digital Media & Com-
munications and Device Solutions. Recognized as one of the fastest
growing global brands, Samsung Electronics is a leading producer of
digital TVs, memory chips, mobile phones and TFT-LCDs. For more
information, please visit www.samsung.com.
• The Trace
™
by Samsung was the slimmest bar phone available in
the U.S. at time of launch in 2006.
• The Samsung t409 was one of the rst mobile phones to support
T-Mobile
®
HotSpot@Home
SM
, launched in 2007.
• The Samsung Memoir
™
is the rst 8.0-megapixel touch-screen
camera phone to be available in the U.S in 2009.
1. EARPIECE/SPEAKER
2. MEMORY CARD SLOT
3. VOLUME KEYS
4. LEFT SOFT KEY
5. MESSAGING SHORTCUT KEY
6. SEND KEY
7. VOICEMAIL KEY
8. SHIFT KEY
9. NAVIGATION KEYS
10. OK (SELECT) KEY
11. MICROPHONE
12. POWER ON/OFF (EXIT) KEY
13. CANCEL/CLEAR KEY
14. RIGHT SOFT KEY
15. CAMERA KEY
16. DISPLAY
17. POWER/ACCESSORY INTERFACE CONNECTOR
KEYS
The following list correlates to the illustrations.
TIP #1: USING THE PARTIAL QWERTY KEYBOARD
The partial QWERTY keyboard combines letters on the keys to con-
serve space; for example, QW share a key. If you send a lot of text
messages, use the XT9 mode which has built-in shortcuts to enter-
ing your message. Simply begin to type your text using the partial
QWERTY keyboard, and the t349 will complete your words by calcu-
lating the words you are typing. With the XT9 predictive text, you only
need to press the keys once, instead of double-clicking. If you are not
in the XT9 mode, press the key to get the rst letter and double-click
the key to get the second letter.
TIP #2: PERIODS, HYPHENS AND SPECIAL SYMBOLS
To access punctuation marks and symbols, press the Shift key in the
lower right of the keypad, next to the Enter key. This key controls the
use of capital and lower-case letters. To access symbols, use the ALT
key plus the Sym/Z/X key. This process is faster and more intuitive in
the XT9 mode.
TIP #3: INSTANT ACCESS TO CONTACTS
When on the home screen, simply press the lower edge of the navi-
gation button as you would to scroll down. Your contact list will ap-
pear on the screen.
TIP #4: CAMERA SHORTCUTS
Press the button with the camera icon on the right side phone. Aim
and take the picture using the same button (top side if you’re holding
the camera horizontally). To use the camera’s 4x digital zoom feature,
press the volume control buttons to zoom in or out, then snap your
photo.
TIP #5: USING REGULAR microSD
™
CARD
The Samsung t349 supports regular microSD
™
cards so you don’t
have to transfer all your les to new HD or SDHC cards. The t349
can support both the regular and new SDHC microSD
™
card up to a
maximum of 4GB. Both cards are recognized automatically by your
phone. You don’t have to adjust anything to accommodate the older
memory card.
TIP #6: USING THE PHONE FOR MASS STORAGE
1. Press Menu > Settings > Personalize > Phone Settings >
USB Mode.
2. Select Mass Storage to use your phone as Mass Storage.
This allows you to use your phone as a removable storage
device with your computer to store and upload les. When
using your phone in Mass Storage mode, you won’t be able
to connect to PC Studio.
TIP #7: SEND PICTURE MESSAGE
1. Select Menu > Messaging > Create Message.
2. Enter the recipient’s contact information
3. Type your message
4. Press the lower edge of the navigation button to access the
icons at the bottom of the screen. Use the left and right
navigation to select Add Picture.
5. Select the le where the photo is stored and press OK. Scroll
through the photos and press the soft key under Add. You can
take a picture by selecting Camera instead of Add Picture.
Press the soft key for Add.
6. Press OK to Send your Picture Message. Separate charges
may apply to send/receive domestic/international picture
messages.
TIP #8: SET UP EMAIL ADDRESS
1. Press Menu > Messaging > Email.
2. On the Email Set-up screen, choose your email service from
the list. If your service isn’t listed, simply select More
Accounts.
3. Complete your email address and password.
TIP #9: SET UP IM
1. Press Menu > Messaging > IM.
2. On the IM Set-up screen, choose your IM service among AIM
®
,
Windows Live
®
and Yahoo!
®
.
3. Sign in with your information and password.
13
12
16
1
2
3
14
4
5
6
7
8
17
15
11
9
10


