


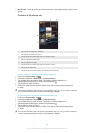
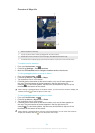

To crop a photo
1
When you are viewing a photo, press , then tap Edit photo > >Crop.
2
To adjust the crop frame, touch and hold the edge of the crop frame. When the
squares at the edges disappear, drag inward or outward to resize the frame.
3
To resize all sides of the crop frame at the same time, touch and hold one of
the four corners to make the squares at the edges disappear, then drag the
corner accordingly.
4
To move the crop frame to another area of the photo, touch and hold inside the
frame, then drag it to the desired position.
5
To save a copy of the photo as you cropped it, tap Save. The original
uncropped version remains on your device.
To use a photo
1
When you are viewing a photo, press , then tap Use as.
2
Select an option from the list that appears.
3
Follow the relevant steps to use the photo.
To edit a photo
•
When you are viewing a photo, press , then tap Edit photo.
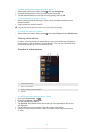
To share a photo
1
When you are viewing a photo, tap the screen to display the toolbars, then tap
.
2
In the menu that opens, tap the application that you want to use to share the
photo, then follow the steps to send it.
To add a geotag to a photo
1
When you are viewing a photo, tap the screen to display the toolbars, then tap
to open the map screen.
2
Find and tap the desired location to put the photo on the map.
3
To adjust the location of the photo, tap the location on the map to where you
want to move the photo.
4
When you are finished, tap OK to save the geotag and return to the photo
viewer.
When a photo is geotagged,
appears along with location information. You can tap this icon
to view the photo on a map.
To delete a photo
1
When you are viewing a photo, tap the screen to display the toolbars, then tap
.
2
Tap Delete.
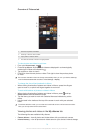
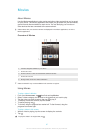
Analysing photos with faces in Album
You can analyse photos with faces saved to your devices. For example, you can add
and edit names for faces.
To analyse photos with faces
1
In the Faces tile, press
, then tap Photo analysis.
2
Tap OK.
To name a face
1
In the Faces tile, find and tap the face you want to name in the Unnamed faces
folder.
2
Tap Add name.
3
Type a name, then tap OK.
82
This is an Internet version of this publication. © Print only for private use.