Operation Guide 3023
4
Exposure Level (Brightness)
Outdoor Sunlight (50,000 lux)
Sunlight Through a Window (10,000 lux)
Daylight Through a Window on a Cloudy Day
(5,000 lux)
Indoor Fluorescent Lighting (500 lux)
Approximate Exposure Time
5 minutes
24 minutes
48 minutes
8 hours
• Since these are the specs, we can include all the technical details.
• Display on 18 hours per day, sleep state 6 hours per day
• 1 illumination operation (1.5 seconds) per day
• 10 seconds of alarm operation per day
• 10 minutes of signal reception per day
• Stable operation is promoted by frequent charging.
Charging Guide
After a full charge, timekeeping remains enabled for up to about 8 months.
• The following table shows the amount of time the watch needs to be exposed to light
each day in order to generate enough power for normal daily operations.
– – –
Recovery Times
The table below shows the amount exposure that is required to take the battery from
one level to the next.
• The above exposure time values are all for reference only. Actual required exposure
times depend on lighting conditions.
10 hours
37 hours
60 hours
Exposure Level
(Brightness)
Outdoor Sunlight (50,000 lux)
Sunlight Through a Window
(10,000 lux)
Daylight Through a Window
on a Cloudy Day (5,000 lux)
Indoor Fluorescent Lighting
(500 lux)
Approximate Exposure Time
Level 5 Level 4 Level 3 Level 2 Level 1
2 hours
6 hours
9 hours
98 hours
35 hours
134 hours
216 hours
▲
▲
▲
▲
▲
Timekeeping
Use the Timekeeping Mode to set and view the current time and date.
• You can also use the Timekeeping Mode setting screen to specify the illumination
duration and 12/24-hour format, to toggle power saving on and off, and to show or
hide the date/day of the week on the main timekeeping screen.
• In the Timekeeping Mode, you can press A to change the display format as shown
below. For information about what the main timekeeping screen looks like when the
date and day of the week are not displayed, see “Hiding the Date/Day of the Week”.
• Pressing C in the Timekeeping Mode will display the Last Signal screen.
Hour : Minutes
PM indicator
Month – Day
▲
Press A.
Day of week
▲
▲
Day of the Week Screen
Last Signal Screen
▲
▲
Press C.
Press C.
Seconds
DST indicator
▲
Setting the Time and Date
Make sure you select your Home City code before you change the current time and
date settings. World Time Mode times are all displayed in accordance with the
Timekeeping Mode settings. Because of this, World Time Mode times will not be
correct if you do not select the proper Home City code before setting the time and
date in the Timekeeping Mode.
To set the time and date
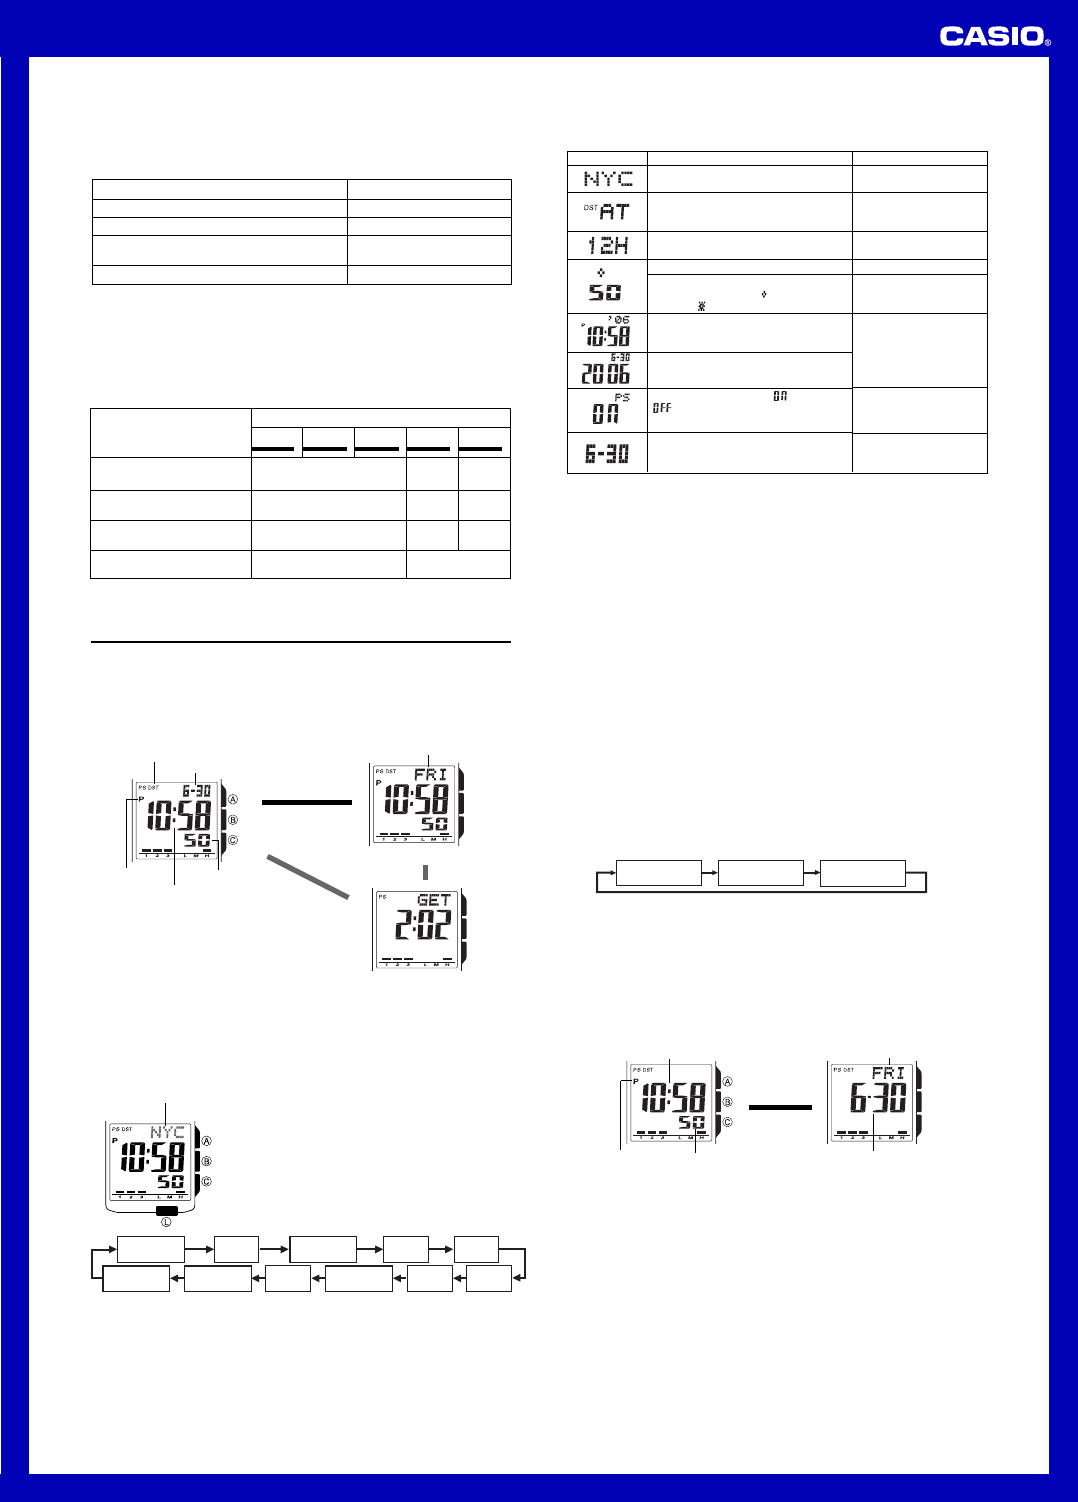
1.In the Timekeeping Mode, hold down A until the city
code starts to flash, which indicates the setting screen.
2.Press B to change the flashing contents in the
sequence shown below to select other settings.
l
l
l
l
l
l
l
l
l
l
l
l
l
l
l
l
l
l
City code
Seconds
Hour
Minutes
12/24-Hour
Format
Month Year
DST
Day
Power
Saving
Show/Hide
Date and Day
City Code
Screen: To do this:
Change the city code
Cycle between auto DST (AT),
Standard Time (
OFF), and Daylight
Saving Time (ON)
Toggle between 12-hour (
12H) and
24-hour (
24H) timekeeping
Do this:
Use C (east) and L
(west).
Press C.
Press C.
3. When the setting you want to change is flashing, use C and/or L to change it as
described below.
Reset the seconds to 00
Toggle the illumination duration setting
between 1.5 seconds (
) and 2.5
seconds ( )
Change the hour, minutes, or year
Change the month or day
Toggle Power Saving on ( ) and off
(
)
Show or hide (indicated by ---)
the date/day of the week on the main
timekeeping screen
Press C.
Press L.
Use C (+) and L (–).
Press C.
Press C.
• See “City Code Table” for a complete list of available city codes.
• Auto DST (
AT) can be selected only while YVR, LAX, YEA, DEN, MEX,
YWG, CHI, MIA, YTO, NYC, YHZ, or YYT is selected as the Home City
code. For more information, see “Daylight Saving Time (DST)” below.
• For information about settings other than the time and date, see the following.
Illumination duration: Illumination
Power Saving: Power Saving Function
• For details about showing or hiding the date/day of the week, see “Hiding the
Date/Day of the Week”.
4. Press A to exit the setting screen.
Daylight Saving Time (DST)
Daylight Saving Time (summer time) advances the time setting by one hour from
Standard Time. Remember that not all countries or even local areas use Daylight
Saving Time.
The time calibration signal transmitted from Fort Collins includes both Standard Time
and DST data. When the Auto DST setting is turned on, the watch switches between
Standard Time and DST (summer time) automatically in accordance with the received
time signal.
• The default DST setting is Auto DST (
AT) whenever you select YVR, LAX,
YEA, DEN, MEX, YWG, CHI, MIA, YTO, NYC, YHZ, or YYT as your
Home City code.
• If you experience problems receiving the time calibration signal in your area, it is
probably best to switch between Standard Time and Daylight Saving Time (summer
time) manually.
To change the Daylight Saving Time (summer time) setting
1. In the Timekeeping Mode, hold down A until the city code starts to flash, which
indicates the setting screen.
2. Press B and the DST setting screen appears.
3. Use C to cycle through the DST settings in the sequence shown below.
Auto DST (
AT
) DST off (
OFF
) DST on (
ON
)
4. When the setting you want is selected, press A to exit the setting screen.
• The DST indicator appears to indicate that Daylight Saving Time is turned on.
Hiding the Date/Day of the Week
You can configure the watch so the date/day of the week does not appear on the main
timekeeping screen.
• Pressing A in the Timekeeping Mode will toggle between a calendar screen
(current date and day of the week) and the main timekeeping screen.
• If you leave the calendar screen displayed for two or three minutes without
performing any operation, the watch will return to the main timekeeping screen
automatically.
Hour : Minutes
SecondsPM indicator
Main Timekeeping Screen
Day of week
Month – Day
Calendar Screen
▲
Press A.
▲
To hide the date/day of the week
1. In the Timekeeping Mode, hold down A until the city code starts to flash, which
indicates the setting screen.
2. Press B 10 times so the current date/day of the week setting is flashing.
• The current date will be flashing if the date/day of the week are currently shown,
while --- will be flashing if they are hidden.
3. Press C to toggle the date/day of the week between show (current date displayed)
and hide (--- displayed).
4. Press A to exit the setting screen.


