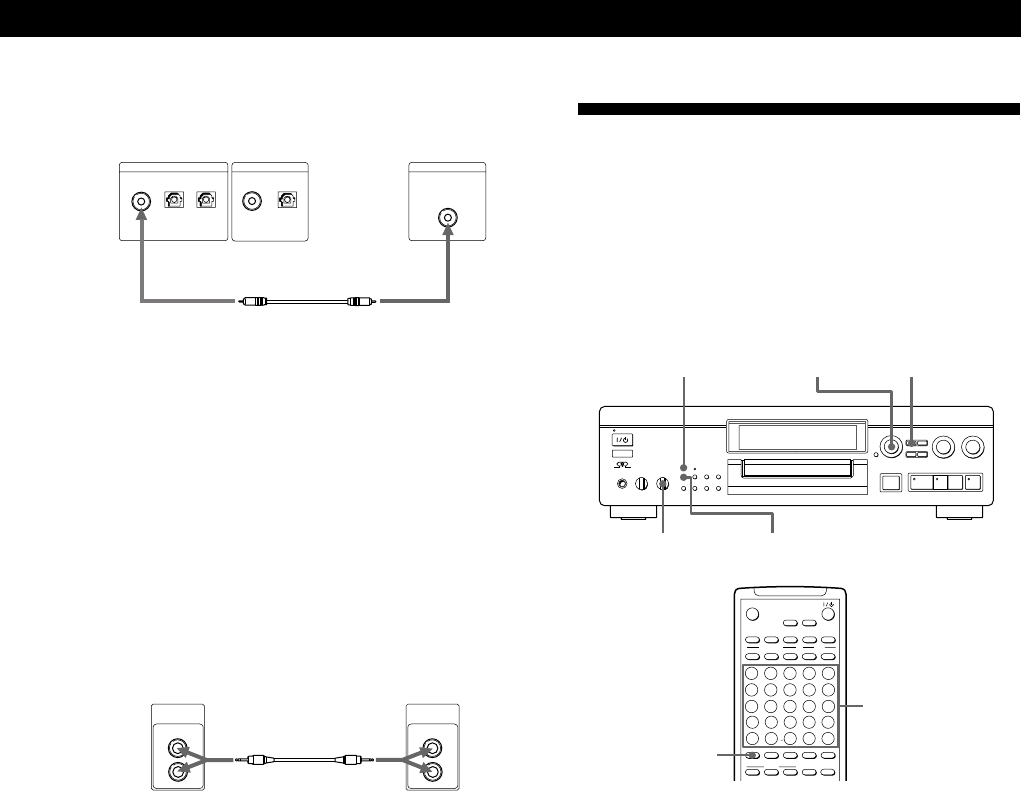
Controlling a Separately Available Sony CD Changer
37
EN
Ç
Ç
S-LINK
CONTROL A1
S-LINK
CONTROL A1
Ç
COAXIAL OPT2OPT1
DIGITAL IN
OUT
DIGITAL
COAXIAL
OPTICAL
COAXIAL
DIGITAL OUT
When using the coaxial digital connecting cable
çç
çç
ç: Signal flow
z If “Din Unlock” and “C71” appear in the display
Make sure the optical cable or the coaxial digital
connecting cable is connected properly.
Connecting a control A1 cable to the CD changer
and MD deck
This lets you perform CD synchro-recording and
operate the CD changer using the controls on the MD
deck or the supplied remote (Mega CD Control
Function). Be sure to make connections firmly.
If a component has more than one CONTROL A1 jack,
you can use either one.
You can connect the cable
to either of the jacks
çç
çç
ç: Signal flow
Notes
• When the deck controls the CD changer with a mode
selector, set the selector to CD1.
• If the plugs are not inserted firmly, “No Connect” appears
in the display and you cannot use the Mega CD Control
Function.
MD deck CD changer
Controlling a CD Changer from
the MD Deck (Mega CD Control
Function)
You can operate a Sony CD changer connected with a
control A1 cable using the controls on the MD deck or
the supplied remote.
1 Turn on the amplifier and set the source selector
to CD.
2 Set INPUT on the deck to the digital input
connector to which the CD changer is connected.
3 Press MEGA CONTROL.
The MEGA CONTROL indicator lights up and the
deck is set to Mega CD Control mode.
4 Press MENU/NO.
The current CD disc number starts flashing in the
display.
5 Turn AMS until the disc number you want
appears, then press AMS (or press the number
buttons and/or >25).
The track number starts flashing.
(Continued)
MD deck CD changer
MEGA CONTROL
indicator
g
0)
§
(
Ppr
≠ AMS ±
MEGA CONTROLINPUT
MENU/NO
§
18
W
23
C
PROGRAM
OPEN/CLOSE
TIME D.O BIT
NUM
!
A˜B
17
V
22
–
B
SHUFFLE PRESENTRECORDED
PLAY MODE
SCROLL
CHAR
?
REPEAT
WRITE CLEAR
16
U
21
Z
A
CONTINUE
DISPLAY
NAME
/
>
25
MENU/NO
19
X
24
.
D
(
P.HOLD
A.SPACE
20
Y
25
,
E
)
M.SCAN
YES
DATE
3
H
8
M
13
R
2
G
7
L
12
Q
1
F
6
K
11
P
4
I
9
N
14
S
5
J
10
O
15
T
FILTER
>25
Number
buttons


