Tv Display
Pan Scan
• Whenwide-screenvideoisplayed,thismodeclipstherightandleftsides
of the image so that it can be viewed on a conventional screen.
•Somewide-screenDVDsthatdonotpermitPanScanmodeplaybackare
automatically played in letterbox mode (black bands that appear at the
top and bottom of the screen).
Letter Box
• Whenwide-screenvideoisplayedinthismodeonaconventionalscreen,
black bands appear at the top and bottom of the screen.
Wide screen
• Thisisthecorrectmodeforplayingwide-screenvideosontheunitorother
external wide-screens.
Note:
•ThedisplayablepicturesizeispresetontheDVD.Thereforetheplayback
picture of some DVDs may not conform to the picture size selected.
•WhenyouplayDVDsrecordedinthe4:3aspectratio,theplaybackpicture
will always appear in the 4:3 aspect ratio regardless of the TV display
setting.
•SelectWideScreentoconformtheLCDscreenontheunit.Alwaysbesure
that your TV display conforms to the actual TV in use if you connect the
unit to a TV.
Default
It takes 3-5 seconds to reset the unit to the factory default.
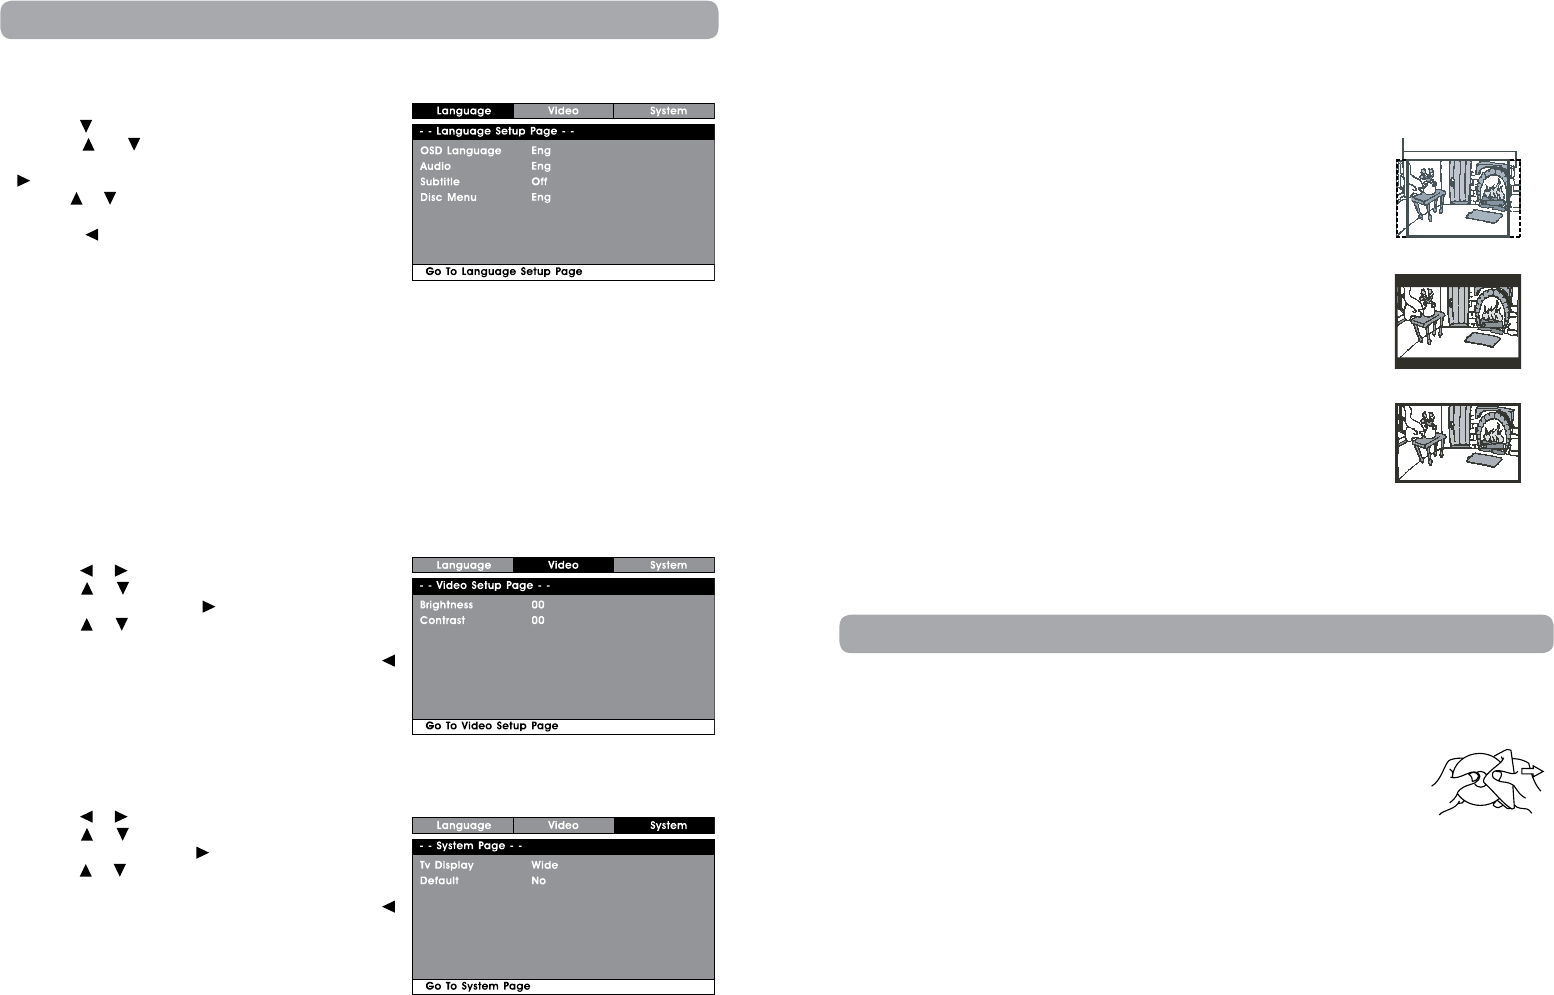
Cut off when a wide-screen
video image is played
Pan Scan
Letter Box
Wide Screen
Cleaning the Disc
A defective or soiled disc inserted into the unit can cause sound to drop out during playback.
Handle the disc by holding its inner and outer edges.
• DoNOTtouchthesurfaceoftheunlabeledsideofthedisc.
• DoNOTstickpaperortapeonthesurface.
• DoNOTexposethedisctodirectsunlightorexcessiveheat.
•Cleanthediscbeforeplayback.Wipethediscfromthecenteroutwardwithacleaning
cloth.
• NEVERusesolventssuchasbenzineoralcoholtocleanthedisc.
• Do NOT use irregular shaped discs (example: heart shaped, octagonal, etc.). They may cause
malfunctions.
Cleaning the Unit
• Besuretoturntheunitoffanddisconnectthepowersourcebeforemaintainingtheunit.
• Wipetheunitwithadrysoftcloth.Ifthesurfacesareextremelydirty,wipecleanwithacloththathas
been dipped in a weak soap-and-water solution and wrung out thoroughly. Then wipe with a dry cloth.
• Neverusealcohol, benzine,thinner,cleaning uidor otherchemicals.DoNOTusecompressed airto
remove dust.
Important Note
• Beforetransportingtheunit,removeanydiscfromthedisccompartment.
Maintenance
Customizing the Function Settings
Language Setup
1. Press the SETUP button.
2. Press the button to select Language setup page.
3. Use the or button to select the option (OSD
Language, Audio, Subtitle or Disc Menu), then press the
button.
4. Use the or button to select your preferred language,
then press the ENTER button to confirm.
5. Press the button to go back to the previous menu.
Repeat steps 2 and 3 to adjust other options.
6. Press the SETUP or RETURN button to exit the menu.
Note:
• SomeDVDsmaynotplayintheaudiolanguageselected.Apriorlanguagemaybeprogrammedonthe
disc.
• SomeDVDsmaybesettodisplaysubtitlesinalanguageotherthantheoneselected.Apriorsubtitle
language may be programmed on the disc.
• SomeDVDsallowyoutochangesubtitleselectionsviathediscmenuonly.Ifthisisthecase,pressthe
MENU button and choose the appropriate subtitle from the selection on the disc menu.
• SomeDVDs maynot includedyourpre-selected language.In thiscase,the DVDplayerautomatically
displays disc menus consistent with the disc’s initial language setting.
Video Setup
1. Press the SETUP button in stop mode.
2. Press the or button to select Video Setup Page.
3. Press the or button to select the option (Brightness
or Contrast), then press the button.
4. Press the or button to adjust the setting, then press
the ENTER button to confirm.
5. Repeat steps 3 and 4 to adjust other options. Press the
button to return to the previous menu.
6. Press the SETUP or RETURN button to exit the menu.
System Setup
1. Press the SETUP button in stop mode.
2. Press the or button to select System Page.
3. Press the or button to select the option (TV Display
or Default), then press the button.
4. Press the or button to adjust the settings, then press
the ENTER button to confirm.
5. Repeat steps 3 and 4 to adjust other options. Press the
button to return to the previous menu.
6. Press the SETUP or RETURN button to exit the menu.


