


T
h
is
is
th
e
In
te
rn
e
t v
e
rs
io
n
o
f th
e
u
s
e
r's
g
u
id
e
. ©
P
rin
t o
n
ly
fo
r p
riv
a
te
u
s
e
.
54 Imaging
• Effects – select from:
• Off – no effect.
• Black & white – no colour.
• Negative – reversed colours.
• Sepia – brown tint.
• Solarize – overexposure.
• White balance – adjust colours to
lighting conditions. Select from Auto,
Daylight, Cloudy, Fluorescent or
Incandescent.
• Metering mode– adjust exposure to
the whole or the centre of the video.
Select from Normal or Spot.
• Picture quality (camera):
Normal or Fine picture quality.
• Turn off mic. (video) – set microphone.
• Shutter sound (camera) – select
different shutter sounds.
• Turn on time and date (camera) – add
time and date to a picture to appear as
green text in the lower right corner.
View in 1:1 size or use zoom when
viewing a picture to see the text.
• Save to – select to save to Memory
Stick or Phone memory.
Camera shortcuts
When using the camera, you can also
use keys as shortcuts to options.
Press for a camera key guide.
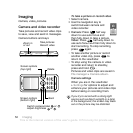
Transferring pictures
Transfer to your computer
Using the USB cable, you can drag
and drop camera pictures to a
computer
% 77 Transferring files using
the USB cable.
To further enhance and organize
camera pictures on a computer,
Windows® users can install Adobe™
Photoshop® Album Starter Edition,
included on the CD with phone or visit
www.sonyericsson.com/cn.
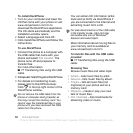
Camera album printing
Camera pictures are saved in
} File manager } Camera album. You
can print camera album pictures in
your phone via the USB cable
connected to a PictBridge™
compatible printer. You can also save
pictures to a Memory Stick Micro™
(M2™) and print them later, if your
printer supports this.
To view your camera pictures
1 } File manager } Camera album.
2 The pictures are shown in thumbnail
view. For a full picture view } View.
You can also print via a Bluetooth
compatible printer.