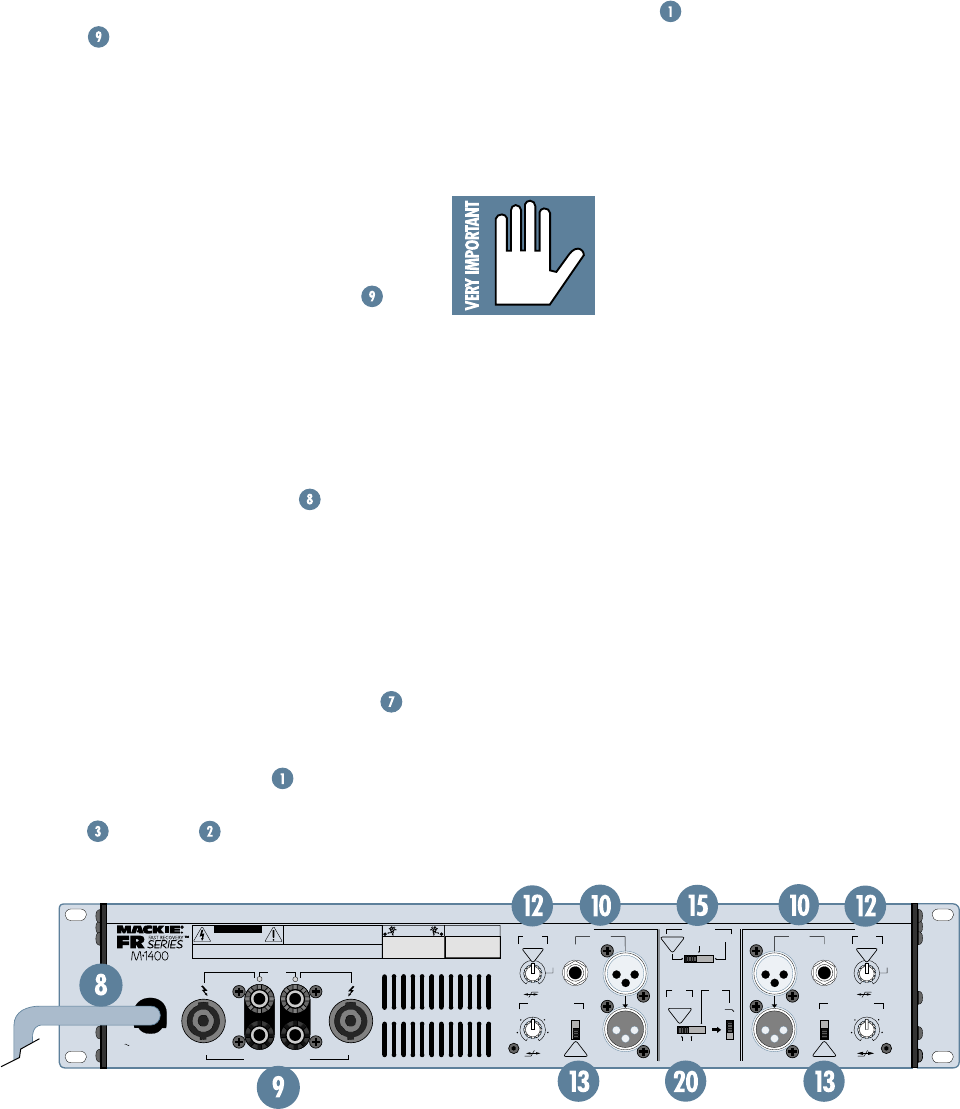
5
8. In
MONO
and
BRIDGE
modes, connect an
input cable to
CHANNEL 1
’s
INPUT
only,
and nothing into
CHANNEL 2
’s
INPUT
.
(You could plug into
CHANNEL 2
’s input,
it just won’t do anything.)
9. In
STEREO
and
MONO
modes, connect
speaker cables to the
SPEAKER OUTPUTS
, either binding posts, 1/4” jacks, or
Speakon
®
, depending on your model:
• The binding post connectors are wired
red = hot (+) and black = cold (–).
• The 1/4" jacks are wired tip = hot (+)
and ring = cold (–).
• The Speakon connectors are wired
pin 1+ = hot (+) and pin 1– = cold (–).
10. In
BRIDGE
mode, connect the binding post
cable like this: the hot (+) side goes in the
CHANNEL 1 SPEAKER OUTPUTS
red
post and the cold (–) side goes in
CHAN-
NEL 2’
s red post. Plug nothing into the
black posts, Speakon jacks (on the
M•1400), or the 1/4" TS jacks (on the
M•1400i).
11. Connect the other ends of the speaker
cables to your loudspeakers.
12. Plug the amp’s power cord
into an
outlet properly configured with the correct
voltage for your amplifier, and capable of
delivering enough current to reach full
power.
13. Make sure your signal source (feeding the
M•1400/M•1400i’s inputs) is powered up
and delivering signal to the amp.
14. Turn the M•1400/M•1400i’s
POWER
switch on and verify that the signal present
(
SIG
) LEDs are blinking.
15. Slowly turn both
GAIN
controls up:
You should hear the music and see the
SIG
and meter LEDs flashing. If the
topmost LEDs (named
OL
, for OverLoad)
are flashing, turn down either the
GAIN
controls on the amp or the source signal’s
output level controls (i.e., master faders).
The point is: The
OL
LEDs should never
light up.
16. For quieter listening, it is preferable to
adjust the amp’s
GAIN
controls rather
than the source signal’s output level
(unless you have the source’s control all
the way up!).
17. Start dancing, but don’t let the ants out of
your pants.
Things You Must Remember:
• Read and follow the
safety instructions on
page 2, and the hearing
protection details on
page 3, before using the
amplifier.
• Never plug amplifier outputs into any-
thing except speakers (unless you have
an outboard box specifically designed to
handle speaker-level signals).
• Before making connections to an amp or
reconfiguring an amp’s routing, turn the
amp’s level (
GAIN
) controls down, turn
the power off, make the changes, turn
the power back on, and then turn the
level controls back up.
• If you shut down your equipment, turn
off the amplifiers first. When powering
up, turn on the amplifiers last.
• Save the shipping boxes! You may need
them someday, and you probably don’t
want to have to pay for them again.
CHANNEL
2
1
CHANNEL
SPEAKER OUTPUTS
63Hz
125Hz
CONSTANT DIRECTIVITY
HORN EQ /AIR EQ
CONSTANT DIRECTIVITY
HORN EQ /AIR EQ
INPUT
THRUTHRU
INPUT
AMP MODE
FREQUENCY
4.5 k Hz
ON
6k Hz
2k Hz
MONO
(CHS SUMMED)
B
R
ID
G
E
LIMITER
(CH1 & CH2)
OFF
FULL
RANGE
SUB
WOOFER
LOW CUT
FILTER
LOW CUT
FILTER
OUTPUT APPLICATION
BALANCED
OR
UNBALANCED
BALANCED
OR
UNBALANCED
ON
/ BRIDGE / MONO
170 Hz
OFF
4.5k Hz
6k Hz
2k Hz
170 Hz
100 Hz
OFF
STAGE
MONITOR
100 Hz
STAGE
MONITOR
OFF
TYPICAL
ON
OFF
TYPICAL
TYPICAL
35 Hz
TYPICAL
35 Hz
STEREO
TYPICAL
STEREO
TYPICAL
AIR EQ
AIR EQ
120 VAC 60 Hz
1000 WATTS
CONCEIVED AND DESIGNED BY MACKIE DESIGNS INC • WOODINVILLE • WA
98072 • USA • MADE IN CHINA • FABRIQUE AU CHINE • PATENTS PENDING • COPYRIGHT ©1997
THE FOLLOWING ARE TRADEMARKS AND REGISTERED TRADEMARKS OF MACKIE DESIGN INC.: "MACKIE", "FR SERIES", AND THE "RUNNING MAN" FIGURE
MANUFACTURING DATE
RISK OF ELECTRIC SHOCK
DO NOT OPEN
WARNING:
TO REDUCE THE RISK OF FIRE OR ELECTRIC SHOCK, DO NOT
EXPOSE THIS EQUIPMENT TO RAIN OR MOISTURE. DO NOT REMOVE COVER.
NO USER SERVICEABLE PARTS INSIDE. REFER SERVICING TO QUALIFIED PERSONNEL.
AVIS:
RISQUE DE CHOC ELECTRIQUE — NE PAS OUVRIR
CAUTION
SERIAL NUMBER
(MONO BRIDGE)
1000 WATTS
8 OHM LOAD
(STEREO)
500 W / 500 W
4 OHM LOAD
OUTPUTS
SUITABLE
FOR CLASS
2 WIRING
OUTPUTS
SUITABLE
FOR CLASS
2 WIRING
CH
1
CH
2
+
––
+
MONO
BRIDGE
+
–


