


Installing Nokia Intellisync Wireless Email
Nokia Intellisync Wireless Email Linux Installation Guide 23
2. Press Enter.
The Enter License Key message appears.
3. Enter a valid license key for your software, and then press Enter.
The License Agreement message appears.
4. Press Enter to scroll through and review the license agreement.
5. When prompted to accept the terms of the license agreement, type Yes, and then press Enter.
The Choose Install Set message appears.
6. Choose one of the following, and then press Enter.
Press 1 to install the components of Nokia Intellisync Mobile Suite for which you have a
license.
The Choose Uninstall Link Folder message appears.
Press 2 only if you have already installed Nokia Intellisync Mobile Suite, and then
proceed to step 15.
7. Press the corresponding number of your choice, and then press Enter. If you select Other,
you can choose any valid path on the system except the /opt/ims installation folder. The
folder you select will contain the links to uninstall the software.
The Advanced Options dialog box appears.
8. Complete one of the following:
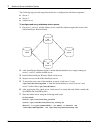
If this is the first server to be set in a clustered environment, or to continue without
configuring a server cluster or external database, press Enter, and then proceed to step 12.
step 12.
To install this application in a clustered server environment or to configure an external
database, type Yes, and then press Enter.
The Cluster Installation message appears.
9. Complete one of the following.
Press Enter if your server is not set up in a clustered server environment or if it is the first
server to be set in a clustered environment.
The Admin Information message appears. Proceed to step 12.
Type Yes if your server is configured in a clustered environment, and then press Enter.
The Database Type message appears.
10. From the Database Type message, press a number from the list, and then press Enter.
The Database Parameters message appears.
11. Enter the appropriate information, and then press Enter.
The Admin Information message appears.
12. For the Administrator Name field, type a default system administrator user name for logging
in WebAdmin Console, and then press Enter.