


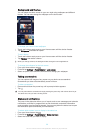


To turn on Wi-Fi®
1
From your Home screen, tap .
2
Find and tap Settings.
3
Drag the slider beside Wi-Fi to the right to turn on the Wi-Fi® function.
It may take a few seconds before Wi-Fi® is enabled.
To connect to a Wi-Fi® network automatically
1
From your Home screen, tap .
2
Find and tap Settings.
3
Tap Wi-Fi. All available Wi-Fi® networks are displayed.
4
Tap a Wi-Fi® network to connect to it. For secured networks, enter the
relevant password.
is displayed in the status bar once you are connected.
To search for new available networks, tap , and then tap Scan.
To add a Wi-Fi® network manually
1
From your Home screen, tap .
2
Find and tap Settings > Wi-Fi.
3
Tap
.
4
Enter the Network name (SSID) information.
5
To select a security type, tap the Security field.
6
If required, enter a password.
7
To edit some advanced options such as proxy and IP settings, mark the Show
advanced options checkbox and then edit as desired.
8
Tap Save.
Contact your Wi-Fi® network administrator to get the network SSID and password.
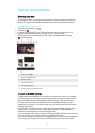
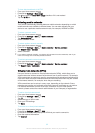
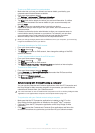
Increasing Wi-Fi® signal strength
There are a number of things you can do to increase the strength of a Wi-Fi® signal:
•
Move your device closer to the Wi-Fi® access point.
•
Move the Wi-Fi® access point away from any potential obstructions or interference.
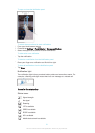
•
Don’t cover the Wi-Fi® antenna area of your device (the highlighted area in the
illustration).
Wi-Fi® settings
When you are connected to a Wi-Fi® network or when there are Wi-Fi® networks
available in your vicinity, it is possible to view the status of these networks. You can
also enable your device to notify you whenever an open Wi-Fi® network is detected.
If you are not connected to a Wi-Fi® network, your device uses a mobile data
connection to access the Internet (if you have set up and enabled a mobile data
28
This is an Internet version of this publication. © Print only for private use.