


•
Secured networks are indicated by next to the Wi-Fi® network name.
Some Wi-Fi® networks do not show up in the list of available networks because they do not
broadcast their network name (SSID). If you know the network name, you can add it manually
to your list of available Wi-Fi® networks.
To turn on Wi-Fi®
1
From your Home screen, tap
.
2
Find and tap Settings.
3
Drag the slider beside Wi-Fi to the right to turn on the Wi-Fi® function.
It may take a few seconds before Wi-Fi® is enabled.
To connect to a Wi-Fi® network automatically
1
From your Home screen, tap .
2
Find and tap Settings.
3
Tap Wi-Fi. All available Wi-Fi® networks are displayed.
4
Tap a Wi-Fi® network to connect to it. For secured networks, enter the
relevant password.
is displayed in the status bar once you are connected.
To search for new available networks, tap , and then tap Scan.
To add a Wi-Fi® network manually
1
From your Home screen, tap .
2
Find and tap Settings > Wi-Fi.
3
Tap
.
4
Enter the Network SSID information.
5
To select a security type, tap the Security field.
6
If required, enter a password.
7
To edit some advanced options such as proxy and IP settings, mark the Show
advanced options checkbox and then edit as desired.
8
Tap Save.
Contact your Wi-Fi® network administrator to get the network SSID and password.
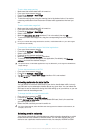
Increasing Wi-Fi® signal strength
There are a number of things you can do to increase the strength of a Wi-Fi® signal:
•
Move your device closer to the Wi-Fi® access point.
•
Move the Wi-Fi® access point away from any potential obstructions or interference.
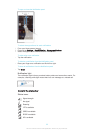
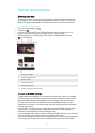
•
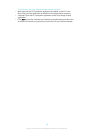
Don’t cover the Wi-Fi® antenna area of your device (the highlighted area in the
illustration).
29
This is an Internet version of this publication. © Print only for private use.