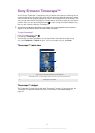
To enable Wi-Fi® network notifications
1
Turn on Wi-Fi®, if it is not already on.
2
From your Home screen, tap .
3
Find and tap Settings > Wireless & networks > Wi-Fi settings.
4
Mark the Network notification checkbox.
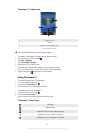
To scan for Wi-Fi® networks manually
1
From your Home screen, tap .
2
Find and tap Settings > Wireless & networks > Wi-Fi settings.
3
Press .
4
Tap Scan. The phone scans for Wi-Fi® networks and displays available networks
in a list.
5
Tap a Wi-Fi® network in the list to connect to it.
Advanced Wi-Fi® settings
Before you add a Wi-FI® network manually, you need to turn on the Wi-Fi® setting in your
phone.
To add a Wi-Fi® network manually
1
From the Home screen, tap
.
2
Find and tap Settings > Wireless & networks > Wi-Fi settings.
3
Tap Add Wi-Fi network.
4
Enter the Network SSID for the network.
5
Tap the Security field to select a security type.
6
If required, enter a password.
7
Tap Save.
Contact your Wi-Fi® network administrator to get the
Network SSID name and Wireless
password.
To view detailed information about a connected Wi-Fi® network
1
From the Home screen, tap
.
2
Find and tap Settings > Wireless & networks > Wi-Fi settings.
3
Tap the Wi-Fi® network that you are currently connected to. Detailed network
information is displayed.
Wi-Fi® sleep policy
By adding a Wi-Fi® sleep policy, you can specify when to switch from Wi-Fi to mobile data.
If you are not connected to a Wi-Fi® network, the phone uses mobile data connection to access
the Internet (if you have set up and enabled a mobile data connection in your phone).
To add a Wi-Fi® sleep policy
1
From the Home screen, tap .
2
Find and tap Settings > Wireless & networks > Wi-Fi settings.
3
Press
.
4
Tap Advanced
.
5
Tap Wi-Fi sleep policy.
6
Select a Wi-Fi sleep policy to use.
Using a static IP address
You can set up the phone to connect to a Wi-Fi® network using a static IP address.
63
This is an Internet version of this publication. © Print only for private use.