


5
Getting Started
Installation Directions
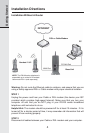
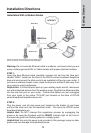
STEP 3
Connect one end of the yellow Ethernet cable to the yellow port, labeled “PC/
LAN,” located on the back of the base unit and connect the other end of the
yellow cable to the Ethernet port of your computer.
STEP 4
Connect one end of the blue Ethernet cable to the blue port, labeled “WAN,”
located on the back of the base unit and connect the other end of the blue cable
to the Ethernet port on your cable or DSL modem.
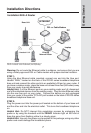
STEP 5
Reconnect power cord to the modem then turn the modem on. Please wait until
all lights on the modem stop blinking.
Helpful Hint: This should take a few minutes, but may take as long as 10
minutes.
STEP 6
Plug the power cord into the power port located on the bottom or your IP8100
series telephone and the other end into the electrical outlet. This turns the IP
8100 series broadband telephone on.
Helpful Hint: Do NOT interrupt this registration process by unplugging the
power or by using the handsets until the READY indicator light on the front of
base has gone from flashing yellow to a steady green.
Helpful Hint: Use only the power cord provided in this package; using an older
power cord can damage the broadband telephone.
STEP 7
Turn your computer on, and check your computer to see if your Internet is
working, try to visit any website. If your Internet is working, please proceed to
STEP 10. If not, please proceed to STEP 8.
STEP 8:
Cable Users
If you receive Internet access through a Cable modem, you may need to register
the IP8100 series phone with your ISP. Please contact them to update your
information; you will likely need your WAN MAC address, which is located on
the bottom of the base. Once your ISP has updated your account, proceed to
step 9.
– OR –
DSL Users
If you have DSL and are required to enter a user name and password (PPPoE)
when accessing the Internet, you may be required to authenticate the IP8100
series telephone.