


iTunes lets you specify the information and content on your computer that you want
to sync with iPhone. By default, iTunes syncs automatically with iPhone whenever you
connect iPhone to your computer.
You can also set up iPhone to sync your MobileMe and Microsoft Exchange accounts,
over the air. See “Mail, Contacts, and Calendar Accounts” on page 16.
Syncing with iTunes
You can set iTunes to sync any or all of the following:
Contacts—names, phone numbers, addresses, email addresses, and more•
Calendars—appointments and events•
Email account settings•
Webpage bookmarks•
Notes (requires Mac OS X version 10.5.7 or later on a Mac, or Microsoft Outlook 2003 •
or 2007 on a PC)
Ringtones•
Music and audiobooks•
Photos and videos (in your computer’s photo application or folder)•
iTunes U collections•
Podcasts•
Movies, TV shows, and music videos•
Applications downloaded from the iTunes Store•
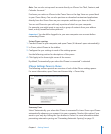
You can adjust sync settings whenever iPhone is connected to your computer.
Ringtones, music, audiobooks, podcasts, iTunes U collections, videos, and applications
can be synced from your iTunes library. If you don’t already have content in iTunes,
the iTunes Store (available in some countries) makes it easy to preview and download
content to iTunes. You can also add music to your iTunes library from your CDs. To
learn about iTunes and the iTunes Store, open iTunes and choose Help > iTunes Help.
Contacts, calendars, notes, and webpage bookmarks are synced with applications
on your computer, as described in the following section. Contacts and calendars are
synced both ways between your computer and iPhone. New entries or changes you
make on iPhone are synced to your computer, and vice versa. Notes and webpage
bookmarks are also synced both ways. Photos and videos (Mac only) can be synced
from an application or from a folder.
Email account settings are synced only from your computer’s email application to
iPhone. This allows you to customize your email accounts on iPhone without aecting
email account settings on your computer.
12
Chapter 1 Getting Started