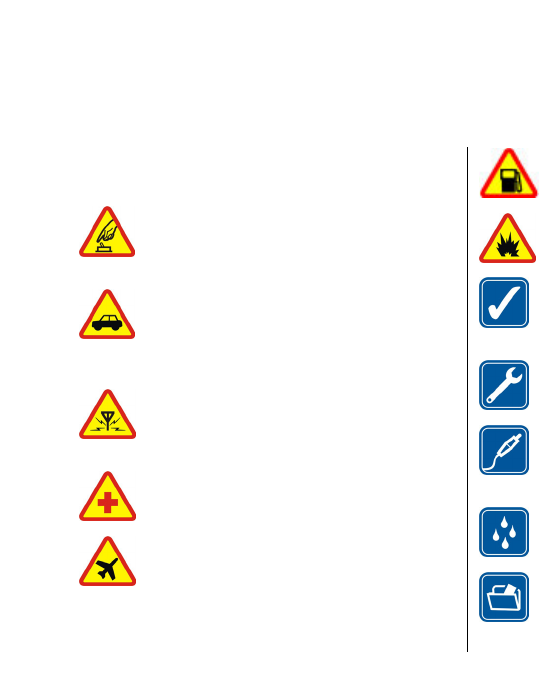
Nokia E51 Cell Phone User Manual


Tip: To select almost all items, first select Options > Mark/
Unmark > Mark all, then select the items you do not want, and
Options > Mark/Unmark > Unmark.
To select an object (for example, an attachment in a document) scroll to the
object so that square markers appear on each side of the object.
Transfer
Select Menu > Tools > Switch.
You can transfer content, such as contacts, from a compatible Nokia device
to your new Eseries device using Bluetooth connectivity or infrared. The type
of content that can be transferred depends on the device model. If the other
device supports synchronisation, you can also synchronise data between the
two devices or send data from this device to the other device.
When you transfer data from your previous device, it may require you to
insert the SIM card. Your new Eseries device does not need a SIM card when
transferring data.
Content is copied from the memory of the other device to the corresponding
location in your device. Copying time depends on the amount of data to be
transferred. You can also cancel and continue later.
The necessary steps for data transfer may vary depending on your device,
and whether you have interrupted data transfer earlier. The items that you
can transfer vary depending on the other device.
Transfer content between devices
To connect the two devices, follow the instructions on the display. For some
device models, the Transfer application is sent to the other device as a
message. To install Transfer on the other device, open the message, and
follow the instructions on the display. On your new Eseries device, select the
content you want to copy from the other device.
After the data transfer, you can save the shortcut with the transfer settings
to the main view to repeat the same transfer later. To edit the shortcut, select
Options > Shortcut settings.
View transfer log
A transfer log is shown after every transfer.
To view the transfer details, scroll to the transferred item in the log, and
select Options > Details.
To view the log of a previous transfer, scroll to a transfer shortcut, if available,
in the main view, and select Options > View log.
Any unresolved transfer conflicts are also displayed in the log view. To start
solving conflicts, select Options > Solve conflicts.
Synchronise, retrieve, and send data
If you have previously transferred data to your device with the Transfer
application, select from the following icons in the Transfer main view:
Synchronise data with a compatible device if the other device supports
synchronisation. With synchronisation, you can keep the data up-to-date in
both devices.
Retrieve data from the other device to your new Eseries device.
Send data from your new Eseries device to your other device.
Personalisation
You can personalise your device by adjusting the various tones, background
images, and screen savers, for example.
Profiles
Select Menu > Tools > Profiles.
You can adjust and customise the ringing tones, alert tones, and other device
tones for different events, environments, or caller groups. The profile
currently in use is shown at the top of the display in the standby mode.
However, if the active profile is General, only today's date is shown.
To create a new profile, select Options > Create new, and define the
settings.
To customise a profile, select a profile and Options > Personalise.
To change a profile, select a profile and Options > Activate. The Offline
profile prevents your device from accidentally switching on, sending or
receiving messages, or using wireless LAN, Bluetooth, or FM radio; it also
closes any internet connection that may be in operation when the profile is
selected. The Offline profile does not prevent you from establishing a
wireless LAN or Bluetooth connection at a later time, or from restarting the
FM radio, so comply with any applicable safety requirements when
establishing and using these features.
To delete a profile that you created, select Options > Delete profile. You
cannot delete the predefined profiles.
Select ringing tones
To set a ringing tone for a profile, select Options > Personalise > Ringing
tone. Select a ringing tone from the list, or select Download sounds to open
a bookmark folder containing a list of bookmarks for downloading tones
using the browser. Any downloaded tones are saved to Gallery.
To play the ringing tone for a selected contact group only, select Options >
Personalise > Alert for, and select the desired group. Phone calls coming
from outside that group have a silent alert.
To change the message tone, select Options > Personalise > Message
alert tone.
Customise profiles
Select Options > Personalise, and define the following:
Ringing tone — Select a ringing tone from the list, or select Download
sounds to open a bookmark folder containing a list of bookmarks for
downloading tones using the browser. If you have two alternate phone
lines in use, you can specify a ringing tone for each line.
Video call tone — Select a ringing tone for video calls.
Say caller's name — When you select this option and someone from your
contacts list calls you, the device sounds a ringing tone that is a
combination of the spoken name of the contact and the selected ringing
tone.
Ringing type — Select how you want the ringing tone to alert.
Ringing volume — Select the volume level of the ringing tone.
Message alert tone — Select a tone for received text messages.
E-mail alert tone — Select a tone for received e-mail messages.
IM alert tone — Select a tone for received instant messages.
Vibrating alert — Select whether you want the device to vibrate when
you receive a call.
Keypad tones — Set the volume level of the device keypad tones.
Warning tones — Set the warning tones on or off.
Alert for — You can set the device to ring only upon calls from phone
numbers that belong to a selected contact group. Phone calls coming from
outside that group have a silent alert.
Profile name — You can give a name to a new profile or rename an
existing profile. The General and Offline profiles cannot be renamed.
Change the display theme
Select Menu > Tools > Themes.
To change the theme used in all applications, select the General folder.
To change the theme used in the main menu, select the Menu view folder.
To change the theme for a particular application, select the application-
specific folder.
To change the background image for the standby mode, select the
Wallpaper folder.
To select an image or write a text for the screen saver, select the Power
saver folder.
Download a theme
To download a theme, select Options > Download > Download
themes. Enter the link from which you want to download your theme. Once
the theme is downloaded, you can preview, activate, or edit it.
To preview a theme, select Options > Preview.
To start using the selected theme, select Options > Set.
3-D ringing tones
Select Menu > Media > 3-D ringing tones.
To enable three-dimensional sound effects for ringing tones, select 3-D
ringing tone effects > On. Not all ringing tones support 3–D effects.
To change the 3–D effect that is applied to the ringing tone, select Sound
trajectory and the desired effect.
To modify the 3–D effect, select from the following:
Trajectory speed — Select the speed at which sound moves from one
direction to another. This setting is not available for all effects.
Reverberation — To adjust the amount of echo, select the desired effect.
Doppler effect — Select On to have the ringing tone sound higher when
you are closer to your device, and lower when you are farther away. This
setting is not available for all effects.
To listen to the ringing tone with the 3–D effect, select Options > Play
tone.
To adjust the volume of the ringing tone, select Menu > Tools >
Profiles > Options > Personalise > Ringing volume.
Volume control
To adjust the earpiece volume during a phone call or the volume of the media
applications, use the volume keys.
10