Memory card
Select Menu > Tools > Memory.
If you cannot use a memory card in your device, you
may have the wrong type of memory card, the card may
not be formatted for your device, or the card has a
corrupted file system. Your Nokia device supports the
FAT16 and FAT32 file system for memory cards.
MicroSD
This device uses a microSD memory card.
To ensure interoperability, use only
compatible microSD cards with this device.
Check the compatibility of a microSD card with its
manufacturer or provider. Other memory cards than
microSD cards are not compatible with this device.
Using an incompatible memory card may damage the
memory card as well as the device, and data stored on
the incompatible card may be corrupted.
Insert the memory card
Use a memory card to save the memory on your device.
You can also back up information from your device to
the memory card.
The sales package of your device may not include a
memory card. Memory cards are available as separate
enhancements.
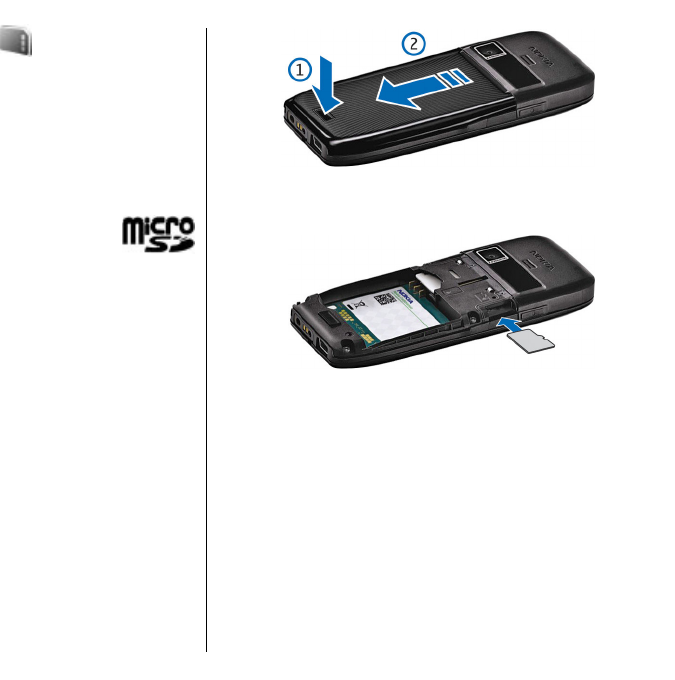
1. With the back of the device facing you, press the
release button (1) and slide the back cover off (2).
2. Insert the memory card in the slot with the contact
area first. Make sure that the contact area is facing
the connectors on the device.
3. Push the card in until it locks into place.
4. Close the back cover.
Use a memory card
To format a memory card for your device, select
Options > Format memory card. When a memory
card is formatted, all data on the card is lost
permanently. Consult your retailer to find out if you
must format the memory card before you can use it.
To change the name of the memory card, select
Options > Memory card name.
You can protect a memory card with a password to
prevent unauthorised access. To set a password, select
29
Your Nokia E51


