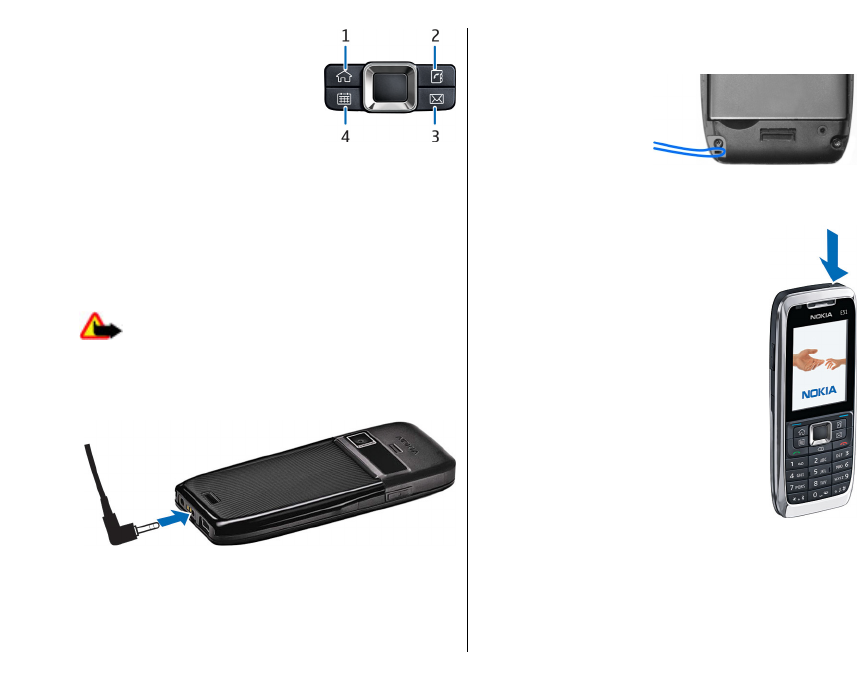
Nokia E51 Cell Phone User Manual


Manage contacts
To add a new contact, select Options > New contact.
To attach a small thumbnail image to a contact, select Options > Edit >
Options > Add thumbnail. The thumbnail image is shown when the
contact calls.
To listen to the voice tag assigned to the contact, select Options > Play
voice tag.
To search for a contact, enter the first letters of the name to the search field.
A list of the contacts starting with the letters appear on the display.
To edit information in a contact, select Options > Edit.
Tip: You can also use Nokia PC Suite to add and edit contacts.
To send contact information, select Options > Send.
You can assign a default number or address to a contact so you can easily
call or send a message to the default number or address, even if several
numbers or addresses are saved to that contact. The default number is also
used in voice dialling.
To change the default information for a contact, open the contact, and select
Options > Defaults. Select the number or address you want to set as a
default. The default number or address is underlined in the contact.
To add a contact to a group, select Options > Add to group (shown only if
you have created a group).
Tip: To check to which groups a contact belongs, select Options >
Belongs to groups.
To add a 1-touch key to the contact's phone number, select Options >
Assign speed dial.
To change the display order of the first and last names of your contacts, select
Options > Settings, and Last name First name, or First name Last
name.
Manage contact groups
You can create a contact group so that you can send messages to several
recipients at the same time.
1. Open the contact groups tab, and select Options > New group.
2. Enter a name for the group, and select OK.
3. Open the group, and select Options > Add members.
4. Scroll to each contact you want to add to the group, and press the scroll
key to mark it.
5. Select OK to add all marked contacts to the group.
To remove a contact from a contact group, scroll to the contact that you want
to remove, and select Options > Remove from group.
Add ringing tones for contacts
You can select a ringing tone for a contact or contact group. If the caller's
phone number is sent with the incoming call and your device recognises the
number, the ringing tone plays when the contact calls you.
To select a ringing tone for a contact or contact group, open the contact or
contact group, and select Options > Ringing tone. A list of ringing tones
opens. Select the ringing tone you want to use.
To remove the assigned ringing tone, select Default tone from the list of
ringing tones.
Send business cards
To send a business card, select the contact from Contacts, select Options >
Send, and the sending method. Enter the phone number or address, or add
a recipient from Contacts. Select Options > Send. If you select text message
as the sending method, business cards are sent without thumbnail images.
Manage received business cards
To view a received business card, select Open from the displayed
notification, or open the message from the Inbox folder in the Messaging
application.
To save a received business card, select > Save business card.
SIM directory
Select Options > SIM contacts > SIM directory.
In the SIM directory, you can see the names and numbers stored on the SIM
card; add, edit, or copy numbers to contacts; and make calls.
To view a SIM contact, scroll to it, and press the scroll key.
To add contacts to your SIM directory, select Options > New SIM contact.
Enter the contact information and select Done.
To view the list of fixed dialling numbers, select Options > SIM contacts >
Fixed dial contacts. This setting is only shown if supported by your SIM card.
To restrict calls from your device to selected phone numbers, select
Options > Activate fixed dialling. You need your PIN2 code to activate
and deactivate fixed dialling or edit your fixed dialling contacts. Contact your
service provider if you do not have the code.
To add new numbers to the fixed dialling list, select Options > New SIM
contact. You need the PIN2 code for this function. When you use fixed
dialling, packet data connections are not possible, except when sending text
messages over a packet data connection. In this case, the message centre
number and the recipient's phone number must be included on the fixed
dialling list. When fixed dialing is activated, calls may be possible to the
official emergency number programmed into your device.
To view your own numbers, if stored on the SIM card, select Options > My
numbers. For example, you may have subscribed to two phone lines with
the same SIM card. Not all SIM cards contain your own numbers.
To edit the contact information, select Options > Edit.
To copy the contact from the SIM directory to Contacts, select Options >
Copy to Contacts.
To check the amount of free memory on your SIM card, select Options >
SIM card details.
Calendar
Select Menu > Calendar.
You can create and view scheduled events and appointments. You can also
set alarms for calendar entries. To synchronise your calendar data with a
compatible computer, use Nokia PC Suite. See the Nokia PC Suite guide.
Create calendar entries
You can create the following types of calendar entries:
Meeting entries have a specific date and time.
Memo entries are related to the whole day but not to a specific time of
the day.
Anniversary entries remind you of birthdays and special dates. They refer
to a certain day but not a specific time of the day. Anniversary entries are
repeated every year.
To-do entries remind you of a task that has a due date but not a specific
time of the day.
To create a calendar entry, scroll to a date, and select Options > New
entry. Select the entry type. The available settings for meeting, memo,
anniversary, and to-do entries vary.
Select from the following:
Subject or Occasion — Enter a description for the entry.
Location — Enter the location information.
Start time — Enter the start time.
End time — Enter the end time.
Start date or Date — Enter the start date or date the event occurs.
End date — Enter the end date.
Alarm — Set an alarm for meeting and anniversary entries. The alarm is
displayed in the day view.
Repeat — Specify whether you want the entry to be repeated and when.
Define the repeat type, frequency, and possible ending date.
Synchronisation — If you select Private, the calendar entry can be seen
only by you and is not shown to others with online access to view the
calendar. If you select Public, the calendar entry is shown to others who
have access to view your calendar online. If you select None, the calendar
entry is not copied to your computer when you synchronise.
Tip: Make sure you have selected the correct city in the Clock
application, because scheduled calendar entries may change when the
current city is changed and is on another time zone.
To edit an existing entry, scroll to the entry, and select Options > Open.
Edit the details in the various fields.
To delete a calendar entry, select Options > Delete, and select Before
date to delete all entries before the selected date, or All entries to delete
all calendar entries from the device.
Tip: When you edit or delete a repeated entry, choose how you want
the change to take effect. If you select All calendar entries deleted,
all repeated entries are deleted. If you select Delete entry, only the
current entry is deleted.
To send a calendar entry to a compatible device, select Options > Send >
Via text message, Via multimedia, Via e-mail, Via Bluetooth, or Via
infrared. If the other device is not compatible with Coordinated Universal
Time (UTC), the time information of received calendar entries may not be
displayed correctly.
To add a received calendar entry to your calendar, open the calendar entry
attachment in the message, and select Options > Save to Calendar.
To respond to a received calendar entry, select Accept, Tentative, or
Decline, if available. If you accept the entry or mark it as tentative, the entry
is added to your calendar. You can send a response to the sender of the
calendar entry by e-mail. Select Yes, and the message is saved in Outbox to
wait for sending.
16