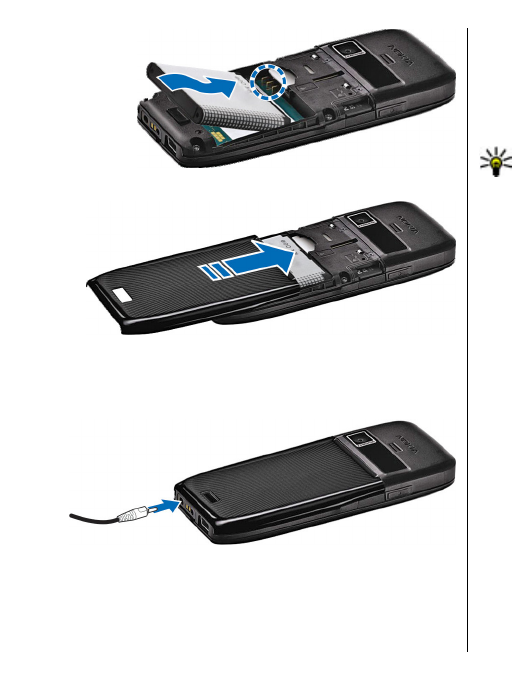
Nokia E51 Cell Phone User Manual


2. Select Back until you return to the Connection settings main view.
3. Select Internet tel. > Options > New profile. Enter a name for the
profile, and select the SIP profile you just created.
To set the created profile to be used automatically when connecting to the
net call service, select Menu > Connectivity > Internet tel. > Preferred
profile.
To login to the net call service manually, select Registration > When
needed in the SIP settings when creating a net call profile.
To make secure net calls, ask your service provider for secure net call settings.
The proxy server selected for the net call profile must support secure net
calls.
Connect to the net call service
To make or receive a net call, your device must be connected to a net call
service. If you have selected automatic login, your device automatically
connects to the net call service. If you login to the service manually, select
an available network from the list and Select.
The list of networks is refreshed automatically every 15 seconds. To refresh
the list manually, select Options > Refresh. Use this option if your WLAN is
not shown on the list.
To select a net call service for outgoing calls if the device is connected to
more than one service, select Options > Change service.
To configure new services, select Options > Configure service. This option
is shown only if there are services that have not been configured.
To save the network to which you are currently connected, select Options >
Save network. The saved networks are marked with a star on the list of
networks.
To connect to a net call service using a hidden WLAN, select Options > Use
hidden network.
To end the connection to a net call service, select Options > Disconnect
from serv..
Make net calls
You can make a net call from all applications where you can make a regular
voice call. For example in Contacts, scroll to the desired contact, and select
Call > Internet call.
To make a net call in the standby mode, enter the SIP address, and press the
call key.
To make a net call to an address that does not start with a digit, press any
number key when the device is in the standby mode, then press # for a few
seconds to clear the display and to switch the device from the number mode
to the letter mode. Enter the address, and press the call key.
To set net call as the preferred call type for outgoing calls, select Menu >
Connectivity > Internet tel. > Options > Settings > Default call
type > Internet call. When your device is connected to a net call service,
all calls are made as net calls.
Net call service settings
Select Options > Settings > Settings:.
To login automatically to the net call service, select Login type >
Automatic. If you use the automatic login type for WLANs, the device
periodically scans for WLANs, which increases the demand on battery power
and reduces the battery life.
To login manually to the net call service, select Login type > Manual.
To view the networks you have saved for the net call service and the
networks detected by the net call service, select Saved conn. networks.
To define the service-specific settings, select Edit service settings. This
option is only available if a service-specific software plug-in has been
installed in the device.
1-touch dialing
Select Menu > Tools > Settings > Phone > Call > Speed dialling >
On.
1-touch dialing allows you to make a call by pressing and holding a number
key in the standby mode.
To assign a number key to a phone number, select Menu > Tools > Speed
dial. Scroll to the number key (2 - 9) on the display, and select Options >
Assign. Select the desired number from Contacts.
To delete the phone number assigned to a number key, scroll to the 1-touch
dialing key, and select Options > Remove.
To modify a phone number assigned to a number key, scroll to the 1-touch
dialing key, and select Options > Change.
Call forward
Select Menu > Tools > Settings > Phone > Call divert.
Forward incoming calls to your voice mailbox or to another phone number.
For details, contact your service provider.
Select to forward voice or fax calls, and select from the following options:
All voice calls or All fax calls — Forward all incoming voice or fax calls.
If busy — Forward incoming calls when you have an active call.
If not answered — Forward incoming calls after your device rings for a
specified period of time. Select the time you let the device ring before
forwarding the call in the Delay time: list.
If out of reach — Forward calls when the device is switched off or out
of network coverage.
If not available — Activate the last three settings at the same time. This
option forwards calls if your device is busy, not answered, or out of reach.
To forward calls to your voice mailbox, select a call type and a forwarding
option, then select Options > Activate > To voice mailbox.
To forward calls to another phone number, select a call type and a forwarding
option, then select Options > Activate > Diverted to:. Enter a number in
the Number: field, or select Find to retrieve a number saved in Contacts.
To check the current forwarding status, scroll to the forwarding option, and
select Options > Check status.
To stop forwarding calls, scroll to the forwarding option, and select
Options > Cancel.
Call restriction
Select Menu > Tools > Settings > Phone > Call barring.
You can restrict the calls that can be made or received with the device
(network service). To change the settings, you need the restriction password
from your service provider. Call restriction affects all call types.
Call barring and call diverting cannot be active at the same time.
When calls are barred, calls may be possible to certain official emergency
numbers.
To restrict calls, select Voice call barring and from the following options:
Outgoing calls — Prevent making voice calls with your device.
Incoming calls — Prevent incoming calls.
International calls — Prevent calling to foreign countries or regions.
Incoming calls when abroad — Prevent incoming calls when outside
your home country.
International calls except to home country — Prevent calls to foreign
countries or regions, but allow calls to your home country.
To check the status of voice call restrictions, select the restriction option and
Options > Check status.
To stop all voice call restrictions, select a restriction option and Options >
Cancel all barrings.
To change the password used for restricting voice and fax calls, select Voice
call barring > Options > Edit barring password. Enter the current code,
then the new code twice. The restriction password must be four digits long.
For details, contact your service provider.
Restrict net calls
Select Menu > Tools > Settings > Phone > Call barring > Internet
call barring.
To reject net calls from anonymous callers, select Anonymous call
barring > On.
Send touch tones
You can send touch tones during an active call to control your voice mailbox
or other automated phone services.
Send a touch tone sequence
1. Make a call, and wait until the other end answers.
2. Select Menu > Options > Send DTMF.
3. Enter the touch tone sequence, or select a predefined sequence.
Attach a touch tone sequence to a contact card
1. Select Menu > Contacts. Open a contact, and select Options > Edit >
Options > Add detail > DTMF.
2. Enter the tone sequence. To insert a pause of about 2 seconds before or
between touch tones, enter p. To set the device to send the touch tones
only after you select Send DTMF during a call, enter w.
3. Select Done.
Voice mail
Select Menu > Tools > Call mailbox.
When you open the Voice mail application for the first time, you are asked
to enter the number of your voice mailbox.
To call your voice mail, select Options > Call voice mailbox.
If you have configured net call settings to your device and have an internet
call mailbox, select Internet call mailbox > Options > Call voice
mailbox to call it.
To call your voice mail in the standby mode, press and hold 1; or press 1 and
then the call key. If you have defined an internet call mailbox, select whether
you want to call your voice mail or internet call mailbox.
To change the voice mailbox number, select the mailbox and Options >
Change number.
14