


5
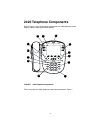
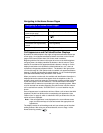
TABLE 1 The 2420 Telephone Components
The following items correspond to the numbers in Figure 1.
1) Call appearance/feature buttons
— For accessing incoming/outgoing
lines and programmed features. An
underscore indicates the currently
selected call appearance.
7) Dialpad — Standard 12-button pad
for dialing telephone numbers.
2) Display — This area shows the
Home, Speed Dial, Call Log, and
Options screens.
8) Speaker button — For
accessing the built-in two-way
speakerphone. The light associated
with this button turns on when the
speakerphone is active.
3) Softkeys — These keys allow you to
perform specific functions. The
functions available and the
corresponding softkey labels change
according to the screen displayed.
9) Headset button — For
activating a headset connected to the
2420 telephone. The light associated
with this button turns on when the
headset is active.
4) Exit button — Pressing this
button returns you to the first page of
the Home screen.
10) Mute button — For turning
off the microphone (handset, headset,
or speaker). When the Mute feature is
active, the associated light turns on
and the person at the other end of the
call cannot hear you.
5) Arrow keys — Depending on the
current screen display, you can use
these keys to move between screen
pages, to cycle through Call Log and
Speed Dial entries, and to move the
cursor during data entry.
11) Volume control buttons — For
adjusting speaker, handset, headset, or
ringer volume depending on which
component is in use.
6) Message lamp — This lamp is lit
when a message has arrived in your
voice mailbox. When you set this lamp
to Visual Ring, it flashes to alert you to
incoming calls. You can retrieve
messages using the button.
12) Call handling buttons — For call
handling activities. See “Call-Handling
Features” on page 10 for more
information.