


Camera-Camcorder 80
6.
To view an image, select it. While viewing an image, you
have the following options:
•
To send the image in a Picture message, press the
Send
soft key.
•
To assign the image as the standby screen Wallpaper or as a
Picture ID for someone in your Contacts list, press the
Set As
soft
key.
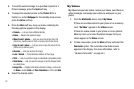
•
To access more options, press the More soft key. The following
additional options pop-up:
–
Camera
— Launches the camera.
–
Erase
— Deletes the image from the My Images folder, provided the
image is unlocked.
–
Rename
— Rename the currently displayed or highlighted picture.
–
Lock / Unlock
— Lock the currently displayed or highlighted picture
so that it cannot be deleted, or unlock the picture so that it can be
deleted.
–
Print
— Print the image on a Bluetooth-compatible printer.
–
Slide Show
— Show the images as a full screen slide show.
–
Image Info
— View the Title, time and date created, size, and
resolution of the currently highlighted or displayed picture.
7. Select the desired option to perform its function or to enter
its sub-menu.
Point, Click, and Send Pictures and Videos
Take a picture or record a video and send it to anyone with a
compatible device in a few easy steps.
1. In Camera mode, press and hold the Camera key ( )
on the right side of the phone. The camera view finder
screen appears in the display.
2. If desired, press the
Mode
button. The camcorder view
finder screen appears in the display.
3. Using the display as a viewfinder, take the desired picture
or record the desired video by pressing the Camera key
( ), and then pressing the Stop button ( ) to stop
video recording.
The photo/video review screen appears in the display.
4. Press the
Send
button, then select
Picture Message
or
Video Message
.
The
Picture Msg
or
Video Msg
screen appears in the
display.
5. Enter the recipient’s phone number or email address using
the keypad.
6. Press the
Done
soft key to save the address(es).
7. Press the Next soft key to move to the
Subject
field. Select
the other message fields as needed. For more information,
refer to “Messaging” on page 49.