


44-
Fun & Media box
When viewing an image, an Options menu is available:
SETTING AN IMAGE AS A MAIN SCREEN, A WELCOME SCREEN OR A GOODBYE SCREEN FROM THE
PICTURES FOLDER
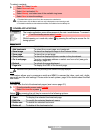
CROPPING
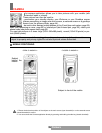
If the image you want to set as a Main screen is too large to be inserted into the
available space, your phone will propose a cropped image.
This allows you to move the image left, right, up and down (cursor key). The im-
age you have cropped is then displayed as such on the mobile (as a Main
screen).
DOWNLOADING IMAGES VIA THE I-MODE
Please refer to ’quick access to i-mode’ page59.
RECEIVING IMAGES VIA THE INFRARED PORT
1. Album 1 and Album 2 are sub-folders of the Pictures menu.
2. The Album 1 and Album 2 Options list only contains View and My preferences.
3. The sending of an image may not be allowed if it is exportation (copyright) protected (the ’File protected’
message is then displayed).
4. To send an image via the infrared port please see infrared port, page 20. To send an image via the Mail (E-
mail or MMS), please see mail system, page 54.
5. Error messages may be displayed when setting, viewing or storing an image:’File too big’: Please see error
messages, page 74; ’Decoding failure’: the image cannot be viewed by the phone.
6. The sending of images via the Infrared port may not be possible if the image is exportation protected. The
’File protected!’ message is then displayed.
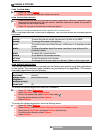
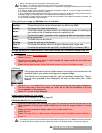
OPTIONS DESCRIPTION
Send by... To send the picture via the Infrared port, by Mail or by MMS.
Rename To change the name of the picture.
Set as...
To set the image as a Main screen, as a Welcome screen on switching on
your mobile or as a Goodbye screen on switching it off.
Details
To show the name, resolution, size, registering date and protection status
of the current file.
Delete To delete the current picture.
Full view To see the picture on full screen.
Zoom +/- To change the picture view to a Smaller, Medium and Larger size.
Rotate... To rotate the picture to the right (90°), to the left (90°) or turnover (180°).
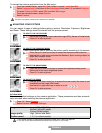
1 Press OK. Select Fun & Media box.
2 Select Pictures.
3 Use the up and down arrow keys to scroll through the image names list and select one.
Select Options and then Set as...
4 Select Set as Main screen, Set as Welcome screen or Set as Goodbye screen.
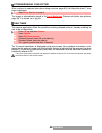
1 Select Set as... then select Main screen. If the image is too big, the crop screen is displayed.
2 Use the cursor key to move the image up, down, left or right (the availability of the four
arrows depends on the image size).
3 Select OK. Stored is then displayed.
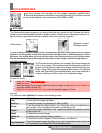
1 Open the infrared port (see infrared port, page 20) and ensure that the infrared port of the
other appliance is facing your mobile infrared port so that the image transfer is correctly
done.
2 When you have received an image, select Options then select View.
3 Select Options.
4 Select Full view, Set as... Main screen, Welcome screen or Goodbye screen, Details or
Zoom +/-.
1. The images you receive via the infrared port are automaticaly stored in the Fun & Media box Pictures sub-folder.
2. To select and activate a Main screen, a Welcome screen or a Goodbye screen, see pictures, page 43.