


Synchronization
Section 2L. Synchronizing with ActiveSync 147
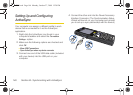
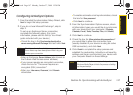
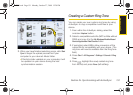
Configuring ActiveSync Options
1. From the initial Synchronization Setup Wizard, click
Next to begin the setup process.
2. If you do not use Microsoft Exchange
®
, skip to
step 3.
To set up an Exchange Server connection,
complete the following steps. (For more
information, please see the Set Up Your Email
guide included with your device.)
Ⅲ Check the box in the Synchronize directly with a
server running Microsoft Exchange field and click Next.
Ⅲ Enter an Exchange Server Address (also known as
the Outlook Web Access server address).
Ⅲ If your server requires an encrypted connection,
check the box for “This server requires an
encrypted (SSL) connection.”
Ⅲ Enter your User name, Password, and Domain
information.
Ⅲ To enable automatic email synchronization, check
the box for
Save password.
Ⅲ Click Next to continue
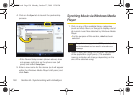
3. From the Synchronization Options screen, check
all information types you would like to synchronize
with your device and your computer. (
Contacts,
Calendar, E-mail, Tasks, Favorites, Files, and Media.)
4. Click Next to continue.
5. Check the box for Allow wireless data connections if
you would like to allow this connection type
(usually disabled if your device is using an active
USB connection), and click
Next.
6. Click Finish to complete the setup process and
establish the partnership. ActiveSync will save the
settings and begin synchronizing your device with
your computer based on those settings.
Note
The information in these fields is case-sensitive.
Some fields may have already been filled in by your
device upon connection.
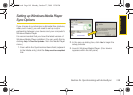
Note
Media synchronization can require that you launch
Windows Media Player to finish the process of setting
up the partnership.
I325.book Page 147 Monday, October 27, 2008 12:20 PM