Copyright
©
2005 Nokia. All rights reserved.
Camera and Gallery
42
To take a picture, press the capture key. Do not move the
device before the image is saved. The image is saved
automatically in the Images & video folder of Gallery. See
"Gallery", p. 54.
Tip! You can also take pictures conveniently in the
Camera mode. See "Take pictures in the Camera
mode", p. 46.
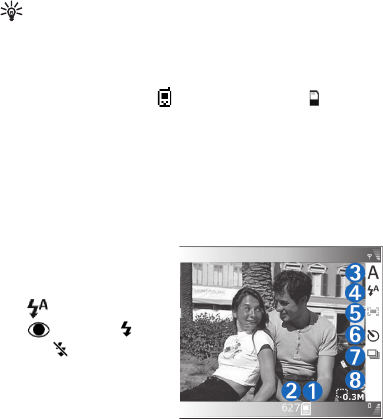
Imaging mode camera indicators show the following:
• The phone memory ( ) and memory card ( )
indicators (1) show where images are saved.
• The images indicator (2) estimates how many images,
depending on the selected image quality, can fit in the
remaining memory of your device or the memory card.
• The scene indicator (3) shows the active scene. See
"Scenes", p. 44.
• The flash indicator (4)
shows if the flash is
set to Automatic
(), Red eye redu.
(), Forced (), or
Off ().
• The green focus
indicator (5) is
displayed when the
focus point is locked
by the viewfinder (not visible in sequence mode).
• The self-timer indicator (6) shows that the
self-timer is activated. See "You in the picture—self-
timer", p. 43.
• The sequence mode indicator (7) shows that the
sequence mode is active. See "Take pictures in a
sequence", p. 43.
• The resolution indicator (8) shows the selected image
quality. See "Adjust still image camera settings", p. 45
Shortcuts are as follows:
• Press the joystick up and down to zoom in and zoom
out. The zoom indicator, which appears on the side
pane, shows the zoom level.
• Press the joystick to enter the Image setup settings.
See "Setup settings—Adjust colour and lighting", p. 44.
• Press the joystick left or right to change the flash mode.
Saving the captured image may take longer if you change
the zoom, lighting, or colour settings.
When taking a picture, note the following:
• It is recommended to use both hands to keep the
camera still.
• To take images or record video in different
environments, use the proper scene for each
environment. See "Scenes", p. 44.


