FOAMPRO® F1000
34
©2001 R11.01
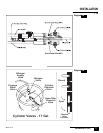
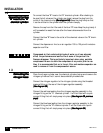
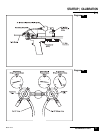
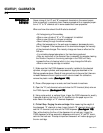
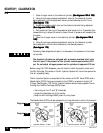
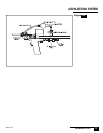
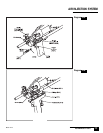
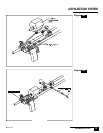
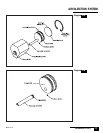
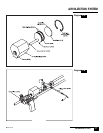
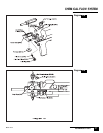
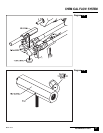
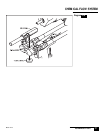
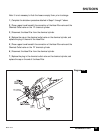
* Insert the new Connecting Rod (D405), O Ring end first, into the flat side
of the Piston (D402). This may require a fair amount of force. Make sure
that the Connecting Rod is oriented with the slot facing down as shown.
(See diagram 35A)(See diagram 35A)
(See diagram 35A)(See diagram 35A)
(See diagram 35A). Make sure the Connecting Rod (D405) is flush with the
back of the piston surface.
* Insert Set Screw (D403) in the side of the Piston and tighten fully to lock
the Connecting Rod in place.
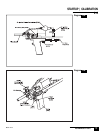
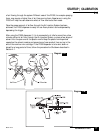
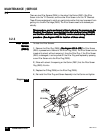
* Lubricate the Connecting Rod (D405) with a small amount of O Ring
Lubricant. This will help in re-inserting the Connecting Rod back through
the Bushing (D406) and will extend the life of the O Rings in the Bushing
(D406).
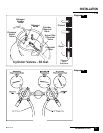
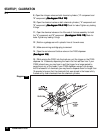
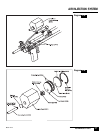
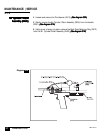
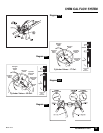
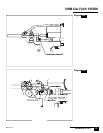
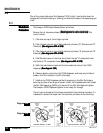
12 | The Bushing (D406) on the front of the Air Cylinder Body (D401) contains
two O rings that may need to be replaced periodically. If the Air Cylinder/Piston
Assembly has already been disassembled for service, it would be a good idea to
replace the O rings in the Bushing (D406).
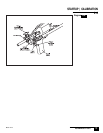
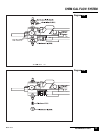
To replace the O Rings:
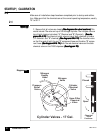
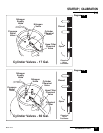
(See diagrams 35B and 35C)(See diagrams 35B and 35C)
(See diagrams 35B and 35C)(See diagrams 35B and 35C)
(See diagrams 35B and 35C)
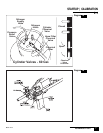
* Using a pair of snap ring pliers, remove the C Clip (D409)
* Push the Bushing (D406) out from the open end of the Air Cylinder Body
(D401)
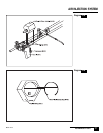
* Replace the Inner O Ring (D407) that is inside the Bushing (D406)
* Replace the Outer O Ring (D408) on the outside of the Bushing (D406)
* Insert the Bushing (D406) back into the Air Cylinder Body (D401)
* Replace the C Clip (D409) onto the Bushing (D406) to lock it in place
MAINTENANCE | SERVICE
3.1.3
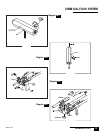
Air Cylinder/ PistonAir Cylinder/ Piston
Air Cylinder/ PistonAir Cylinder/ Piston
Air Cylinder/ Piston
Assembly (D400)Assembly (D400)
Assembly (D400)Assembly (D400)
Assembly (D400)