FOAMPRO® F1000
48
©2001 R11.01
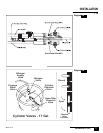
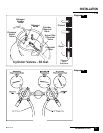
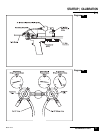
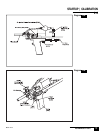
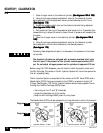
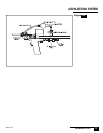
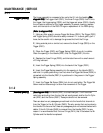
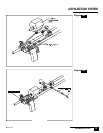
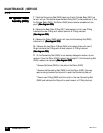
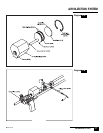
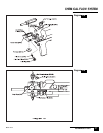
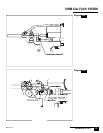
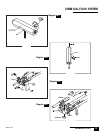
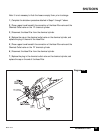
The Ports can be cleaned by removing the Mix Cartridge from the Carrier (D501)
and cleaning the ports while they are in place.
(See diagram 49A)(See diagram 49A)
(See diagram 49A)(See diagram 49A)
(See diagram 49A)
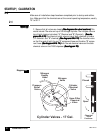
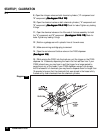
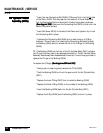
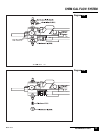
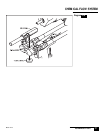
This procedure can be performed without relieving the pressure on the Chemical
Flow System, provided that the Red chemical valve (D503R) and the Blue chemical
valve (D503B) remain closed during the entire procedure
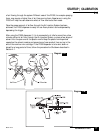
(See diagram 49C for(See diagram 49C for
(See diagram 49C for(See diagram 49C for
(See diagram 49C for
location of these valves)location of these valves)
location of these valves)location of these valves)
location of these valves). The Mix Cartridge has small ports on each side that can
be cleaned. DO NOT REMOVE THE PORTS.
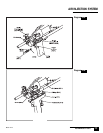
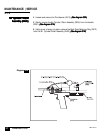
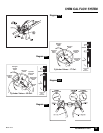
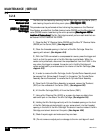
1 | Close the Red “A” Chemical Valve (D503R) and the Blue “B” Chemical Valve
(D503B) on the Carrier (D501)
(See diagram 49C)
2 | Clean the threaded opening in the front of the Mix Cartridge. Rinse this
opening with solvent.
(See diagram 49A)
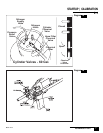
3 | With the F1000 connected to a compressed air source, press the trigger and
hold it so that the center rod in the Mix Cartridge is pulled back. While the
center rod is pulled back, disconnect the compressed air from the F1000. In this
way, when the trigger is released, the center rod in the Mix Cartridge will
remain pulled back to provide access to the interior of the Mix Cartridge.
(See
diagram 49C)
4 | In order to remove the Mix Cartridge, the Air Cylinder/Piston Assembly must
be removed first. Follow steps 2 through 5 in the section “Air Cylinder/Piston
Assembly Service Procedures” to remove the Air Cylinder/Piston Assembly.
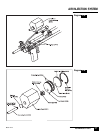
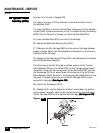
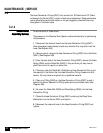
5 | Once the Air Cylinder/Piston Assembly is removed, remove the Thumbnut
(D510) on the underside of the Carrier (D501).
(See diagram 49D)
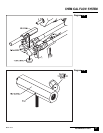
6 | Lift the Mix Cartridge (D603) off from the Carrier (D501).
7 | Using a Port Cleaning Pick (A1009) or a paper clip clean any debris from
each small port on the sides of the Mix Cartridge.
(See diagram 49A)
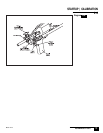
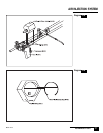
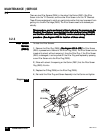
8 | Holding the Mix Cartridge vertically with the threaded opening on the front
of the Mix Cartridge pointed straight up, pour some solvent into the threaded
opening in the front of the Mix Cartridge. This should rinse the inside of the Mix
Cartridge, and solvent should exit the ports.
(See diagram 49B)
9 | Check the ports again and make sure they are clean.
10 | Do not remove or adjust ports or damage to the mix cartridge will result.
Mix CartridgeMix Cartridge
Mix CartridgeMix Cartridge
Mix Cartridge
Removal andRemoval and
Removal andRemoval and
Removal and
CleaningCleaning
CleaningCleaning
Cleaning
(D603 or Optional(D603 or Optional
(D603 or Optional(D603 or Optional
(D603 or Optional
Cartridge)Cartridge)
Cartridge)Cartridge)
Cartridge)
3.2.6
3.2
MAINTENANCE | SERVICE