


Network Settings
Settings Options
DiVitas Client User Guide for Nokia E and N Series Phones, v2.7
67
By default, when the handset has an active WLAN connection, the DiVitas Client will try to
use the connection to reach the DiVitas Server. If the DiVitas Server cannot be reached
on the active WLAN connection, the DiVitas Client then uses the active packet data
connection.
You might want to prevent the DiVitas Client from using certain connections. For example,
if you have a packet data connection that is only for multimedia messaging, the DiVitas
Client might not work properly over the connection. Multimedia messaging connections
also can be more expensive than packet data connections used for web browsing.
Likewise, if you have WLAN connections that cannot reach the DiVitas Server, you might
want to prevent the DiVitas Client from attempting to use those connections.
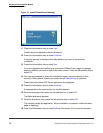
To prohibit the DiVitas Client from trying to use a specific connection:
1 Select Options > Settings > Network settings > Access point preferences.
2 Select the desired connection to disable.
3 Select Options > Disable access point, or press the Navi scroll key.
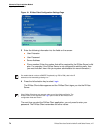
The icon next to the disabled connection changes to an “x” in a gray circle.
To re-enable a connection, select it, then select Options > Enable access point, or press
the Navi scroll key. The icon next to the re-enabled connection changes back to green.
Disabling or re-enabling a connection applies only to DiVitas Client use of the
connection, and does not affect the connection’s status outside the client. For
example, if a connection is enabled on the handset, and you disable the
connection in the client, then select Menu > Tools > Settings > Connection >
Access points, you can observe that the connection is still enabled.