


4. INMARSAT C OPERATIONS
4-28
4.2.4 Automatically printing received messages
You may automatically print received messages (except confidential or password
affixed) as follows:
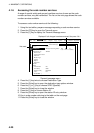
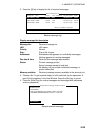
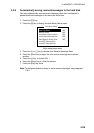
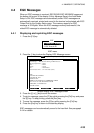
1. Press the [F8] key to display the Setup menu.
2. Press the [5] key to display the Auto Mode Setup menu.
Auto Mode Setup
Auto Log Print OFF
Receive Alarm OFF
Auto Receive Message Save OFF
Auto Receive Message Print OFF
Data Report & Polling Print OFF
Auto EGC Message Save
Auto EGC Message Print
Auto mode setup menu
3. Press the [↑] or [↓] key to choose Auto Receive Message Print.
4. Press the [Enter] key.
5. Press the [↑] key to choose ON.
6. Press the [Enter] key to close the window.
7. Press the [Esc] key twice.
4.2.5 Saving received messages to the hard disk
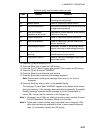
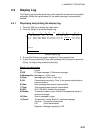
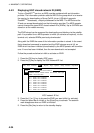
1. Press the [F6] key.
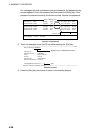
2. Press the [2] key to display the Receive Message Log.
Receive Message Log
Message No.
R0971106.001
R0971105.002
R0971105.001
R0971101.001
R0971024.001
LES
KDDI
KDDI
KDDI
KDDI
KDDI
Priority
Normal
Normal
Normal
Normal
Normal
Addressee
CAPTAIN
OFFICER
Rec date & Time
02-02-04 16:10
02-02-05 17:30
02-02-05 14:15
02-02-01 3:45
02-01-24 13:20
Status
Saved
Printed
Printed
Printed
Saved
Memory Available: 3317 Bytes
Size
32767
200
1234
3256
8251
ENTER: Display S: Save D: Delete
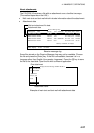
Sample delete message screen
3. Press the [↑] or [↓] key to choose a file. To confirm contents of a file, press the
[Enter] key. For confidential messages, the password entry window appears
after pressing the [Enter] key. Enter the password and press the [Enter] key.
4. Press the [S] key to copy the file to the hard disk. For confidential messages
the password entry window appears. Enter password and press the [Enter]
key.
Note: If a file by that name already exists on the hard disk, “Already exist on
DISK.” appears.