


Connecting your 338 to a PC -104-
To do this, follow the steps below:
Please check that this service is supported by your service provider - contact 3 for further details.
Synchronisation Settings
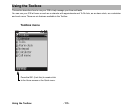
Press the MENU key Æ Synchronisation Æ Select a Server Æ press SK2 (Settings)
An explanation of the different server settings is detailed below:
Please check that this service is supported by your service provider - contact 3 for further details.
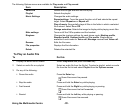
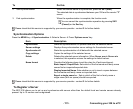
To Do this
1 Start up the connection function Press the MENU key Æ select Synchronisation.
2 Select a server Select from Server one to Server ten or rename an existing server to
create a new entry.
3 Configure the synchronisation settings Press the SK2 (Settings). On Sync. settings screen, set the server
information: Profile name, Server name, Authentication, User
database, Server database, Synchronisation method, User name,
Password, Internet User name and Internet password. For details
see below.
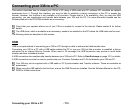
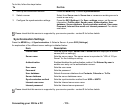
Item Description
Profile name Sets the profile name. Server one to Server ten are displayed as default
names (with no settings).
Server name Sets the server name. The server name is equivalent to "URL of 3 Sync
Server" for the Intellisync setting.
Authentication Enables/disables the authentication method. Set Entered by user to
enable user entry on the authentication screen.
User name Sets the user name.
Password Sets the password.
User database Selects the server database from Contacts, Calendar or To Do.
Server database Sets the server database name.
Synchronisation method Sets the synchronisation method from USB or UMTS.
Internet user name Sets the Internet server user name.
Internet password Sets the Internet server password.