


2 - 20
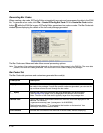
Generating Bar Codes
When creating a bar code, EZConfig Editor automatically encrypts and compresses the data in the EXM
file. To generate a bar code, click File > Create EZConfig Bar Code OR the Create Bar Code toolbar
button while the EXM file is open. EZConfig Editor generates a bar code or codes. The Bar Codes tab
window opens displaying the details of the bar code package generated.
The Bar Codes and Advanced tabs offers several processing options.
Note: The number of bar codes produced depends on the amount of data present in the EXM file. The more data
present, the more bar codes generated. You must scan all bar codes to deploy the package!
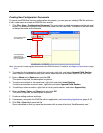
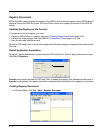
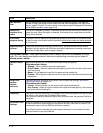
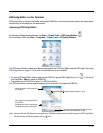
Bar Codes Tab
The Bar Codes tab previews and customizes generated bar code(s).
Field/Option Description
Display Indicates which bar code is displayed in the preview area; the default is “1,” the first
bar code in the package. If more than one bar code was generated, you can use the
up and down arrows to scroll through the bar codes.
(___ bytes) Displays the exact byte size of the bar code displayed in the preview area.
Total Package Size (page 2-23) is displayed at the bottom of the window.
Note: The sum of bar code size is typically larger than the package size.
Remote Path Type in the location and filename where the EXM file should be deployed on the
terminal. For instance,
\ipsm\deviceconfig.exm (\Honeywell for 6100/6500)
Tap the browse button to navigate to the location on the terminal. Your
ActiveSync connection must be active.
Full Contents Includes the full content of the EXM file in the bar code, without simplifying.