


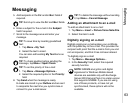

Messaging
62
Messaging
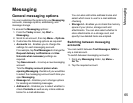
Tick the checkboxes if you wish to enable SSL
connection.
The Network connection: field enables you to
select the network to which your e-mail server
connects.
Tap Done when you have finished.
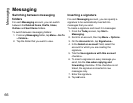
20.Tap Next.
21.Select the frequency with which to send and
receive your e-mail in the Automatic Send/
Receive: field.
22.Tap the Review all download settings link to
set the following additional settings if required:
The Download messages: field enables you to
set the time range for downloading messages
from the server.
Tap Advanced Settings to edit additional
settings for sending, receiving and deleting
e-mails if required.
Tap Done, then Next when you have finished.
23.Select the format for sending messages (HTML
or Plain Text) in the Message format: field.
24.Select the download size limitation in the
Message download limit: field.
25.Tap Finish.
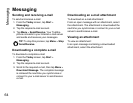
Creating an e-mail
To create an e-mail:
1. From the Today screen, tap Start >
Messaging.
2. Tap the e-mail account to use.
3. Tap Menu > New.
4. With the cursor in the To: field, add recipient(s)
using one or more of the following methods:
•Press the Action key, then tap a recipient from
the list of contacts.
•Tap Menu > Add Recipient..., then tap a
recipient from the list of contacts.
• Enter the first few letters of a name stored in
Contacts, then tap Menu > Check Names. If
several matches are displayed, select the
required one.
• Enter e-mail address(es) in the To: field. Use a
semicolon to separate multiple recipients.
IMPORTANT: SSL connection enables you
to send and/or receive personal information
more securely. If you select one or both of
these options and your ISP does not support
SSL connection, you will not be able to send
and/or receive e-mail.