


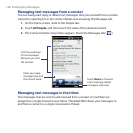
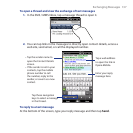
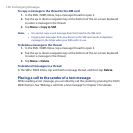

144 Exchanging Messages
If the settings are not found on your device, select the Try to get e-mail
settings automatically from the Internet checkbox to find and download
email server settings from the Internet and then tap Next.
Note You may be charged when your device connects to the Internet and downloads
the email server settings.
4. Enter Your name and the Account display name and then tap Next.
Note If the E-mail Setup wizard was unsuccessful in finding and downloading settings
from the Internet, select Internet e-mail from the Your e-mail provider list on
the next screen. You will be asked to enter email server settings. See “To specify
email server settings” for details.
5. In the Automatic Send/Receive list, choose how frequent you want email
messages to be automatically sent and downloaded on your device.
Note Tap Review all download settings to select download options, set the email
format as HTML or plain text, and more. For more information, see “To customize
download and format settings."
6. Tap Finish.
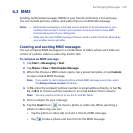
To specify email server settings
If Auto Setup is unsuccessful, contact your ISP or email provider for the Incoming
mail server and Outgoing mail server settings so you can enter them on your
device.
Other options that you can select include the following:
• Select the Outgoing server requires authentication check box, if required
by your provider.
• If the outgoing email server requires a different user name and password
for sending email, clear the Use the same user name and password for
sending e-mail check box. You will be prompted to enter this information.
• Tap Advanced Server Settings, then select the Require SSL check boxes
if your email provider uses an SSL connection for more secured email. From
the Network connection list, select the data connection that you use for
connecting to the Internet.