T-Mobile MDA III User Manual
42
T-Mobile MDA III User Manual
43
3.6 Photo Contacts
Photo Contacts make your T-Mobile MDA III more fun and
practical. It allows you to assign still or animated photos to the
entries in your Contacts. When a person calls you (for whom
you have previously assigned a photo in Photo Contacts),
that photo will appear on your T-Mobile MDA III’s incoming call
screen. Use the rich set of features to get the photos displayed
with the size, position, and animated template you want.
Creating a new photo contact:
1. Tap > Programs > Photo Contacts.
2. Select a contact from the list, or create a new one by tapping
Edit > then New.
Note: Contacts here fully mirror those in Microsoft
Contacts.
3. Tap
Edit > then Assign Photo...
4. Tap the eld next to Type to select the type of les you want
listed, ie, jpeg, bmp, gif or all > Tap next to Find in: to select
the location of a le.
NOTE: You can use
JPEG, BMP, still GIF, or animated GIF
les for your
Photo Contacts.
5. Tap a picture le, then
OK, and OK again until you return to
the Contacts screen. You can see the photo at the bottom
of the screen.
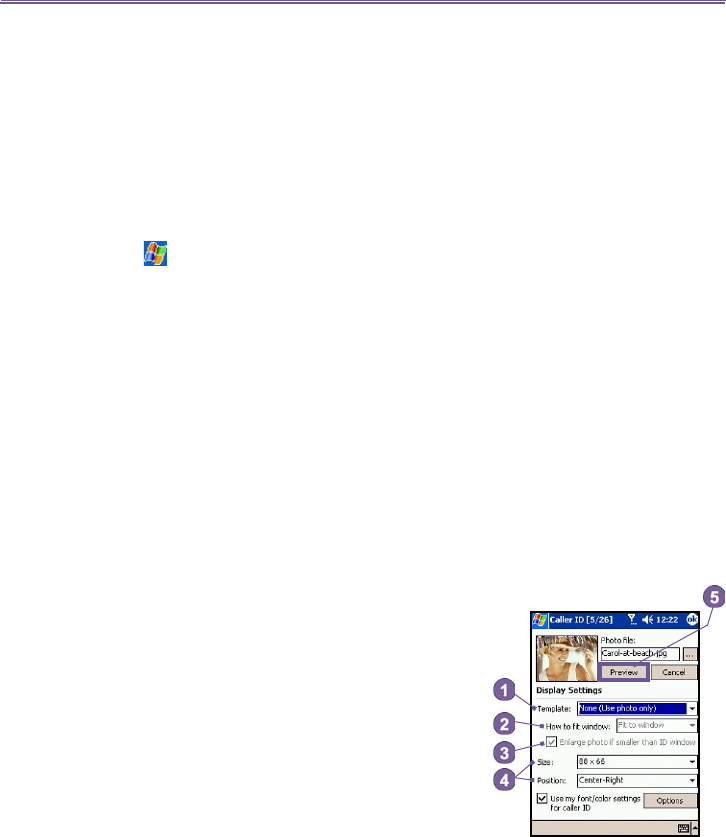
To preview and adjust settings:
In step 5 above, after you tap OK once you will arrive at the
preview and display settings screen. In Display Settings
you can:
1. Add extra style by assigning a template to the photo.
NOTE: A few sample Photo Contacts templates (animated
graphical templates that can frame your assigned photos)
are included in your T-Mobile MDA III
's local storage in the
\My Documents\Templates folder.
2. Choose how you want the photo to t to the window.
3. Enlarge the photo if it is smaller than the window.
4. Choose a size and position for the picture.
5. View all of these changes by tapping Preview.


