198 Experiencing Multimedia
Experiencing Multimedia 199
Playlists
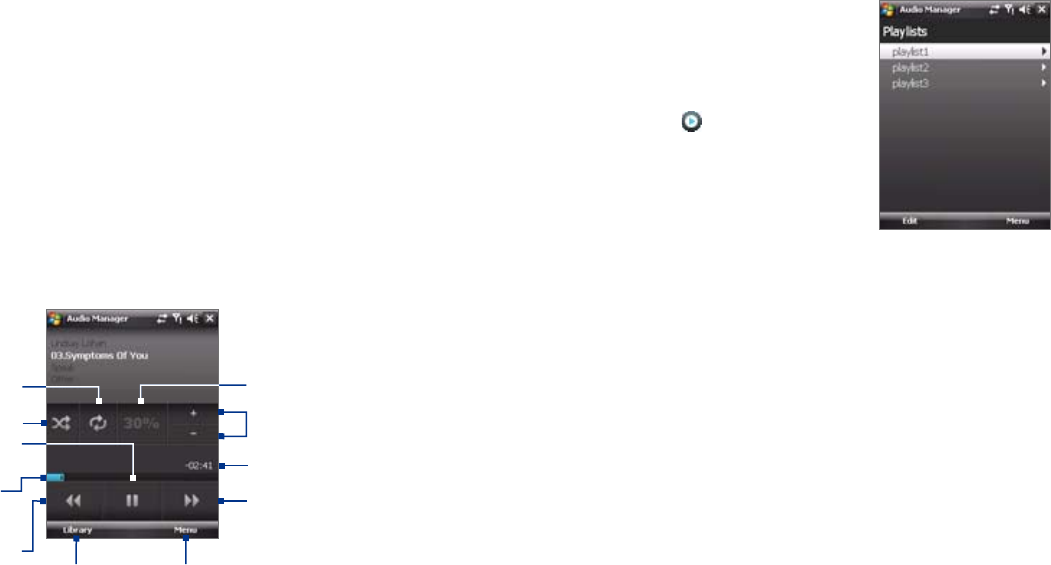
The Playlists screen shows the current playlists that are found on the device
memory and memory card.
There are two types of playlists that will be shown on the Playlist screen:
• Windows Media® Player playlists.
These are playlists that are in Windows
Media® Player Mobile’s Library (which
is synchronized with Windows Media®
Player on your computer), and they
are indicated by the Windows Media®
Player icon ( ). They can be played
in Audio Manager’s Music Player but
cannot be edited.
• Custom playlists. These are playlists
that are created in Audio Manager and
can be edited.
Notes • Audio Manager will search for playlists in the following locations:
Device: \Playlists
\Application Data\HTC\AudioManager\playlists
Memory card: \Storage Card\Playlists
• If a Windows Media® Player playlist contains a combination of music,
video and image files, Audio Manager accesses the music files only and
filters out the other media types.
To create a playlist
1. On the Library’s Main screen, tap Playlists.
2. On the Playlists screen, tap Menu > New.
3. Enter a Playlist name then tap OK.
4. On the Playlists screen, tap the playlist you have just created then tap
Edit.
5. Tap Menu > Add.
6. Tap the check boxes to select the songs you want to add to the
playlist, or tap Menu > Select All to choose all the songs.
7. Tap OK three times to return to the Playlists screen.
When you tap a category on the Library’s Main screen, you will see more
submenus which may have deeper levels of menus. For example, when you
tap Artists, another level of submenus will be listed showing artist names.
When you tap an artist name, more submenus showing album names will
be displayed. Just keep opening the submenus until you reach the level
where song titles can be selected for playback.
Music files that are protected by Digital Rights Management (DRM) will be
listed under the Protected category. A lock icon shown before song titles
indicates that the music files are protected. Select a file then tap Info if you
want to view file information. A cross-marked lock icon shown before song
titles indicates that the rights for the music files have expired, and you will
not be able to play them. Tap Delete if you want to delete these files.
Note Audio Manager keeps track of the last submenu that you accessed. When
you exit Audio Manager and open it again, it will display the last submenu
that you were in. Keep tapping the submenu name at the top of the screen
until you reach the Library's Main screen.
Music Player
When you select a music file in the Library, Music Player opens and
automatically plays it. Use the available buttons to control the playback.
Repeat
Shuffle
Playback time
Play/Pause
Increase/Decrease
volume
Go to previous
song
Return to
Library screen
Go to next track
Volume level
Open a menu where you can choose
to add the current song to a playlist,
set the song as ring tone, and more.
Drag the slider to
move forward or
backward in a track.
