


Exchanging Messages 119
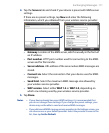
Set up a custom domain e-mail
When you are using an e-mail domain name that is hosted by a different e-mail
provider (for example, your e-mail address may be Benjamin@startup.com
but Email.com hosts the e-mail account and provides e-mail services), select
the Custom Domain option in the E-mail Setup wizard to set up your e-mail
account on your device.
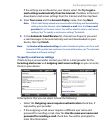
1.
Add a new e-mail account. See “Add an e-mail account” for instructions.
2.
Enter your E-mail address and the Password for your e-mail account
and select the Save password option. Tap Next.
3.
Clear the Try to get e-mail settings automatically from the
Internet, then tap Next.
4.
In Your e-mail provider, select Custom domain and then tap Next.
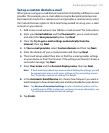
5.
Enter the domain of your e-mail provider and then tap Next.
6.
The E-mail Setup wizard then tries to find the e-mail provider settings
on your device or from the Internet. If the settings are found, it shows a
successful message. Tap Next.
7.
Enter Your name and the Account display name, then tap Next.
Note If the E-mail Setup wizard was unsuccessful in finding the settings, you will
be prompted to enter e-mail server settings on the succeeding screens.
See “To specify e-mail server settings” for details.
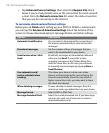
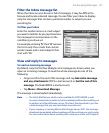
8. In the Automatic Send/Receive list, choose how frequent you want e-
mail messages to be automatically sent and downloaded on your device.
Note Tap Review all download settings to select download options, set the
e-mail format as HTML or plain text, and more. For more information, see
“To customize download and format settings.”
9. Tap Finish.