


Nokia Network Voyager for IPSO 4.0 Reference Guide 121
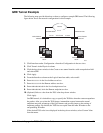
GRE Tunnel Example
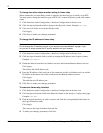
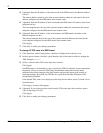
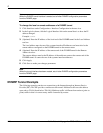
The following steps provide directions on how to configure a sample GRE tunnel. The following
figure below shows the network configuration for this example.
1. Click Interfaces under Configuration > Interface Configuration in the tree view.
2. Click Tunnels in the Physical column.
3. Click the drop-down window in the Create a new tunnel interface with encapsulation field
and select GRE.
4. Click Apply.
5. From the Interface column on the Logical interfaces table, select tun01.
6. Enter
10.0.0.1 in the Local address text box.
7. Enter
10.0.0.2 in the Remote address text box.
8. Enter
192.68.26.65 in the Local endpoint text box.
9. Enter
192.68.26.74 in the Remote endpoint text box.
10. (Optional) Select a value from the TOS value drop-down window.
Click Apply.
On GRE tunnels, it is desirable to copy or specify the TOS bits when the router encapsulates
the packet. After you select the TOS feature, intermediate routers between the tunnel
endpoints may take advantage of the QoS features and possibly improve the routing of
important packets. By default, the TOS bits are copied from the inner IP header to the
encapsulating IP header.
If the desired TOS value is not displayed in the drop-down window, select Custom Value
from the menu.
Internet
Remote PCs
Site B
Remote PCs
Site A
192.68.23.0/24
10.0.0.210.0.0.1
VPN Tunnel
192.68.22.0/24
192.68.26.74/30192.68.26.65/30
00001
Nokia Platform
Nokia Platform