


Nokia Network Voyager for IPSO 4.0 Reference Guide 345
8. (Optional) From the drop-down list in the Log Level field, select Info. Click Apply.
9. (Optional) Click Up.
10. In the Policies table, enter
rule_1 as the name for a new policy in the New Policy text box.
Click Apply.
11. In the policies table, click on
rule_1
.
The corresponding Configuring Policy page appears to complete the missing parameters of
the policy.
12. Select
MD5-DES from the Add a Proposal drop-down list. Enter 1 in the Priority text box.
13. If no default is selected, select Pre-Shared Secret in the Authentication Method field.
14. Enter a text string, such as
secret, in the Enter Shared Secret text box and Shared Secret
(Verify) text box. Click Apply.
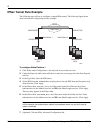
15. Click Up to return to the IPSec General Configuration page.
Under the IPSec Tunnel Rules table, enter
IPSec_tunn in the New Tunnel field.
16. If Create a logical interface appears, select Yes.
17. Enter
192.68.26.65 in the Local Address text box.
18. Enter
192.68.26.74 in the Remote Address text box.
Click Apply.
19. Click on the name in Tunnel Rules table.
The IPSec Tunnel IPSec_tunn page appears.
20. (Optional) Click On to activate Hello Protocol.
Click Apply. The Hello Interval and Dead Interval text boxes appear.
21. (Optional) Enter
60 as a value in the Hello Interval text box and enter 180 as a value for the
Dead Interval text box.
Click Apply.
22. From the drop-down list in the Select Policy field, select rule_1.
Click Apply.
A new table, Linked Policy, appears.
23. Select
SITE_A from the Source Filters drop-down list.
24. Select site_B from the Destination Filters drop-down list.
25. Click Apply.
26. Click Save to make your changes permanent.