


2
136 Nokia Network Voyager for IPSO 4.0 Reference Guide
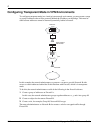
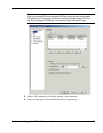
To configure transparent mode in the preceding network configuration
1. Click Transparent Mode under Configuration > Interface Configuration in the tree view.
2. Enter any positive integer (an integer greater than 0) in the edit box, for example
100 and
click Apply.
3. Click the link of the transparent mode group you created. It will appear as XMG with the
number you entered in step 3, for example XMG 100.
4. In the Add Interface drop-down box, select an interface to associate with the transparent
mode group. In this case, select the logical interfaces associated with IP address 1.5.3.3/24
and click Apply.
Note
Because transparent mode groups are disabled by default, do not associate interfaces
to a transparent mode group that is in use. If you do, you will lose connectivity to those
interfaces.
Note
An interface can be in at most one group. Once you have associated an interface to a
group, you will not have the option to associate it with another group.
5. In the Add Interface drop-down box, select the logical interfaces associated with IP address
1.5.3.4/24 and click Apply.
6. Click Up.
7. Select Yes in the Enable column associated with XMG 100 and click Apply.
8. Click Save to make your changes permanent
Note
When you make changes to a transparent mode group, you must stop and restart the
firewall.
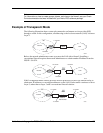
Once you have enabled transparent mode and restarted your firewall, packets destined for your
LAN are sent at Layer 2. Packets destined for an IP address are sent at Layer 3.
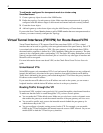
Configuring Transparent Mode
You configure transparent mode by first creating a transparent mode group and then adding
interfaces to the group. When interfaces are in the same transparent mode group, then they are
logically in the same subnet. A transparent mode group is disabled until you enable it.