


Nokia Network Voyager for IPSO 4.0 Reference Guide 79
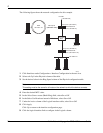
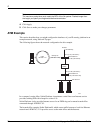
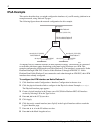
To configure the ATM interface on Nokia Platform A
1. Click Interfaces under Configuration > Interface Configuration in the tree view.
2. Select atm-s2p1 in the Physical column of the table.
3. Enter 93 in the VCI text box in the Create a new LLC/SNokia Platform RFC1483 interface
section.
The channel number of the interface is no longer the VCI number but an automatically
allocated number. Therefore, the logical name of the interface in step 6 is something that
depends on what other logical ATM interfaces there are. Find the newly created interface
from the table before you continue.
4. Click Apply.
5. Click atm-s2p1c93 in the Logical Interfaces table. The Interface page is displayed.
6. Enter
192.168.3.2 in the Local Address text box.
7. Enter
192.168.3.1 in the Remote Address text box.
8. Click Apply
9. Enter
9180 in the IP MTU text box.
10. Click Apply.
11. Click Save.
Note
The steps for configuring the ATM interface on Nokia Platform B are the same except that
you should set the to 52 when you create the logical interface and reverse the IP addresses
should be reversed.
IP over ATM (IPoA)
To configure an ATM logical IP subnet (LIS) interface
1. Click Interfaces under Configuration > Interface Configuration in the tree view.
2. Click the physical interface link to configure in the Physical column. Example:
atm-s2p1
.
The Physical Interface page is displayed.
3. Select SONET or SDH as the framing format in the Physical Configuration table.
The setting should match the type of transmission network to which the interface is
connected.
4. Select Freerun or Loop Timing as the transmit clock choice in the Physical Configuration
table.
Freerun uses the internal clock. If two ATM interfaces are directly connected, at least one of
them must use the internal clock.