


2
144 Nokia Network Voyager for IPSO 4.0 Reference Guide
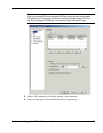
To create the virtual tunnel interface
1. In Network Voyager navigation tree, select Configuration > Interface Configuration >
FWVPN tunnel.
2. Enter the name of the peer gateway in the Peer GW Object Name field. Use the same name
you assigned the gateway when you created it in the SmartDashboard.
3. From the drop-down list, select the proxy interface. Because the proxy interface is used as
the source IP address for the outbound traffic, you would normally choose an external
interface for the proxy interface. You can also use a loopback interface.
4. Click Apply and then Save.
The new tunnel is added to the list of tunnels. If the status field shows a status other than OK,
you can click on the tunnel interface name to display details about the VTI. The Description
field contains information provided by the Check Point software about the status of the VPN
tunnel.
Note
Both the Description and Status fields are read-only fields. Do not edit them.
Once created, a VTI is always up unless you administratively set it down.