


Nokia Network Voyager for IPSO 4.0 Reference Guide 341
below the policy section. The link to more pages appears only after you create more than 10
policies.
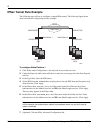
Creating an IPSec Tunnel Rule
To create an IPSec tunnel rule
1. Click IPSec under Configuration > Security and Access in the tree view.
2. Click the IPSec link.
3. Under the IPSec Tunnel Rules heading, enter a name in the New Tunnel text box.
4. If the Create a logical interface option appears and you want to create a logical interface, set
the button to Yes.
5. Enter the IP address of the local end of the IPSec tunnel in the Local Address text box.
The local address must be one of the system interface addresses and must be the remote
endpoint configured for the IPSec tunnel at the remote gateway.
6. Enter the IP address of the remote interface to which the IPSec tunnel is bound in the
Remote Address text box.
The remote endpoint cannot be one of the system interface addresses and must be the local
endpoint configured for the IPSec tunnel at the remote gateway.
7. Click Apply.
An Apply Successful message appears and an entry for the new tunnel appears in the IPSec
Tunnel Rules table.
Note
IPSO can support up to 1500 rules. However, each Network Voyager page displays a
maximum of 10. If you create more than 10 rules, they are continued on new pages.
Access these pages by clicking the link directly below the rule section. The link to more
pages appears only after you create more than 10 rules.
8. Click on the new link with the name that you entered in the IPSec Tunnel Rules table.
The IPSec Tunnel page appears.
9. (Optional) Activate Hello Protocol inside the tunnel, then click Apply.
Note
This and the following two steps are not applicable for tunnels without logical interface
parameters.